How To Make Japanese Milk Bread using the Tangzhong Method
Learn how to make fluffy and delicious Japanese Milk Bread using the Tang Zhong method! This easy-to-follow recipe provides step-by-step instructions and helpful tips to ensure your bread turns out perfectly every time. With just a few simple ingredients, you can make this delicious bread in the comfort of your own home. Try it today and enjoy the unique texture and flavor of Japanese Milk Bread!
Have you ever wondered how those Asian bakeries could make the softest and most fluffy bread? If you want to know how to make Japanese milk bread using the unique baking method called Tangzhong, you have come to the right place. This classic white bread is a staple in Japan. Its unique texture and flavor are very well-known. Japanese Milk Bread will surely be a hit if you’re looking for an exciting sandwich bread or a fresh dinner roll. It is manageable to make, and the outcome is so rewarding. You will not want to get the store-bought one once you learn how to make it. So grab your apron, preheat the oven, and prepare to make some delicious homemade Japanese Milk Bread for your loved ones today.

Recipe Snapshot
EASE: Don’t let those complicated baking terms scare you. It is easier to make than you might think.
PROS: It’s fluffy, tasty, and has a long shelf life.
CONS: It takes time and patience to make.
WOULD I MAKE THIS AGAIN? Yes, I would make it every day if I could.
What is Japanese Milk Bread?
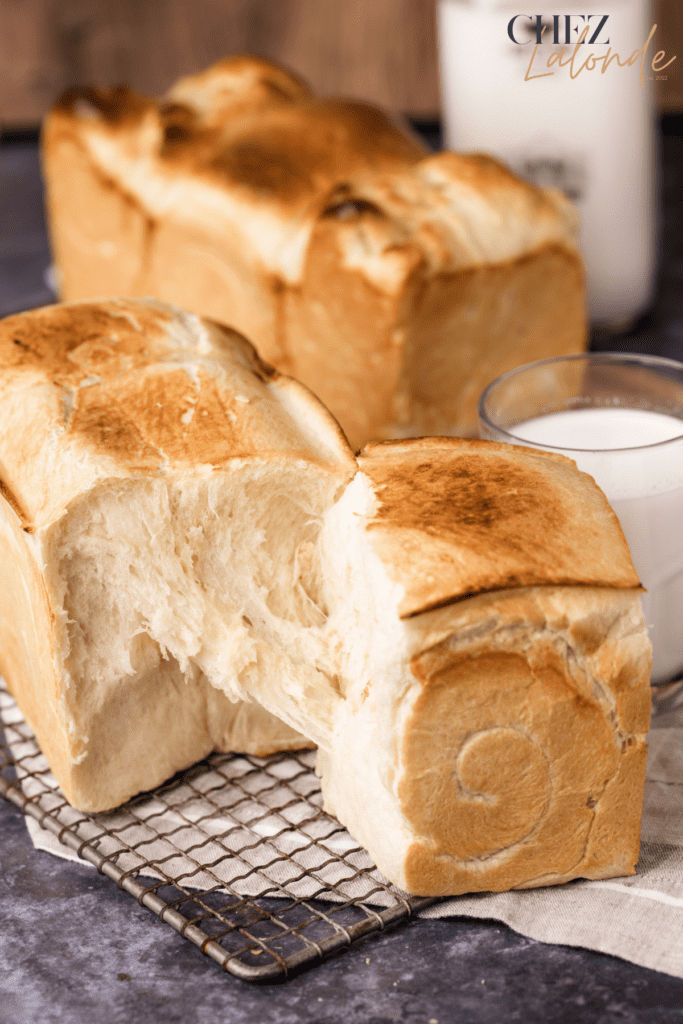
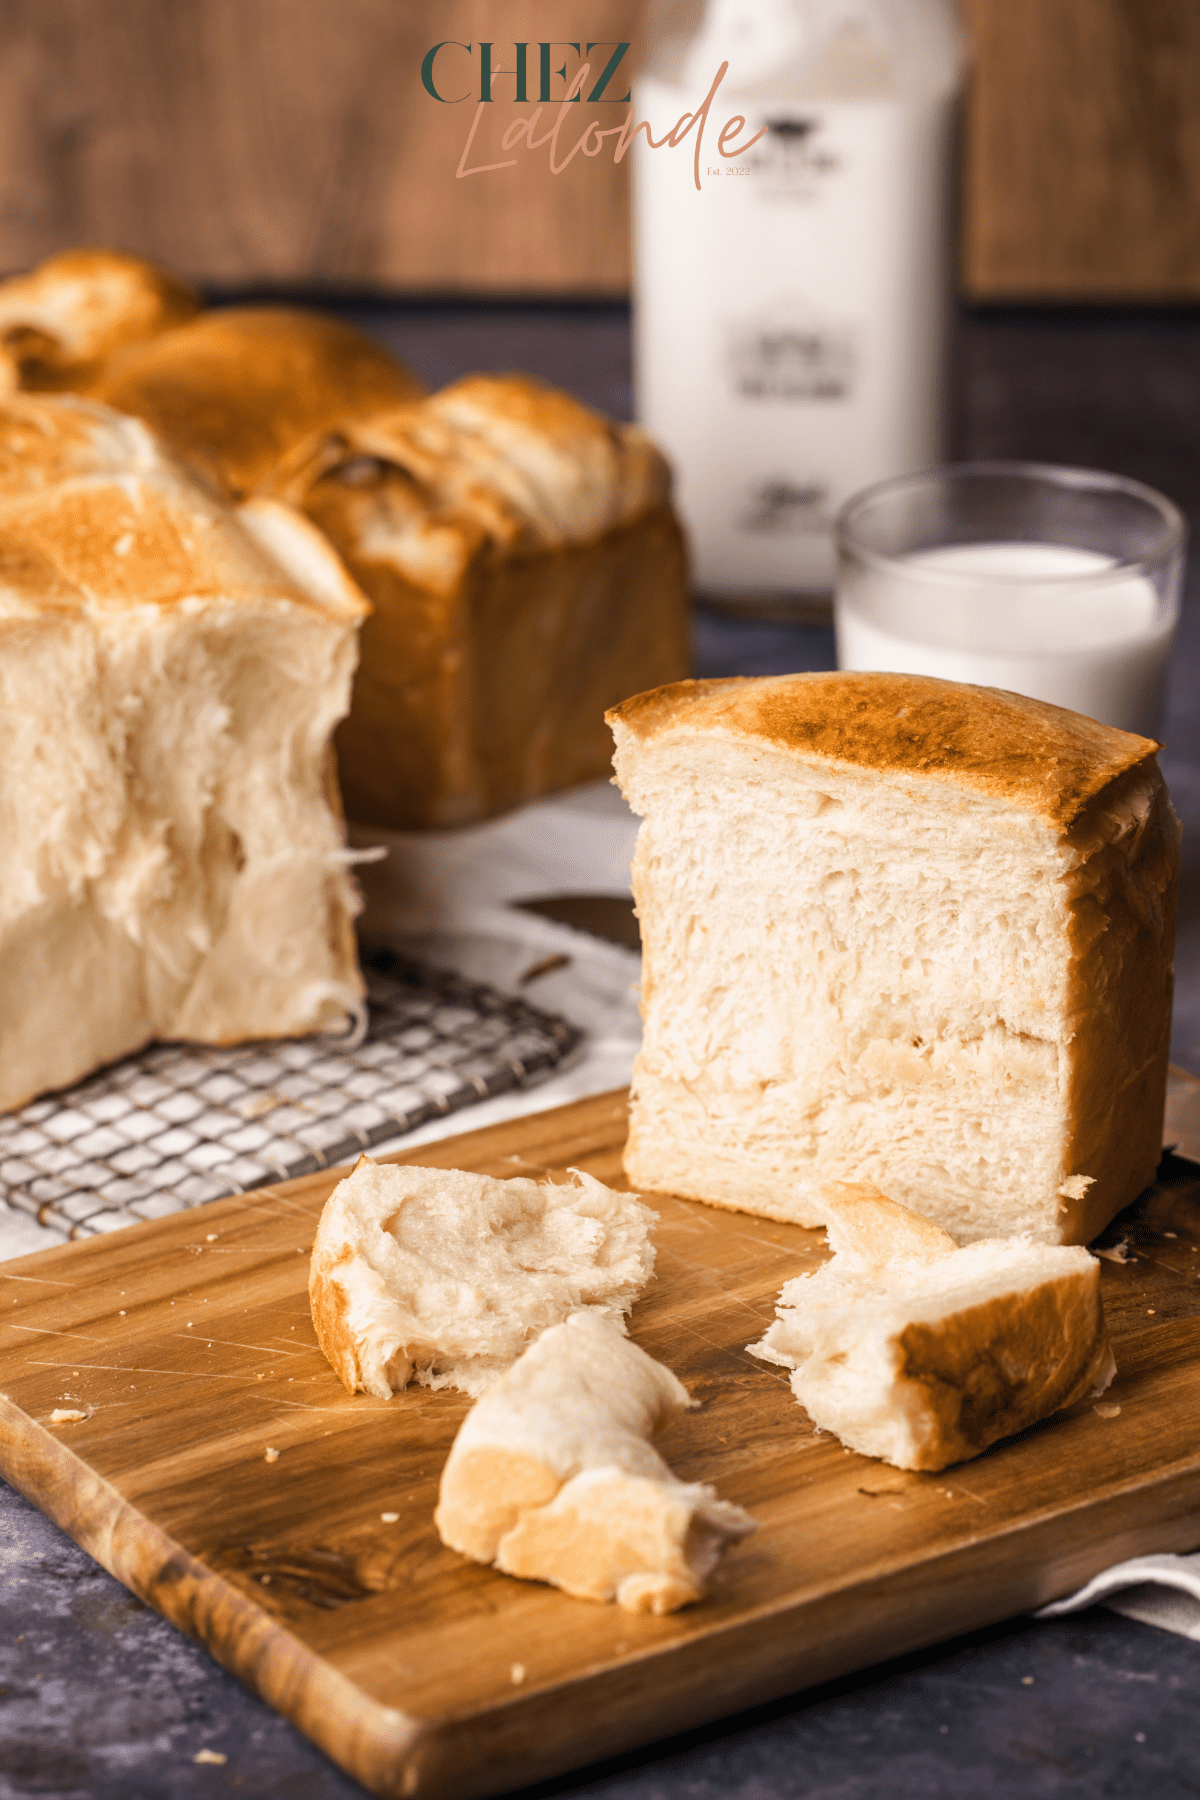
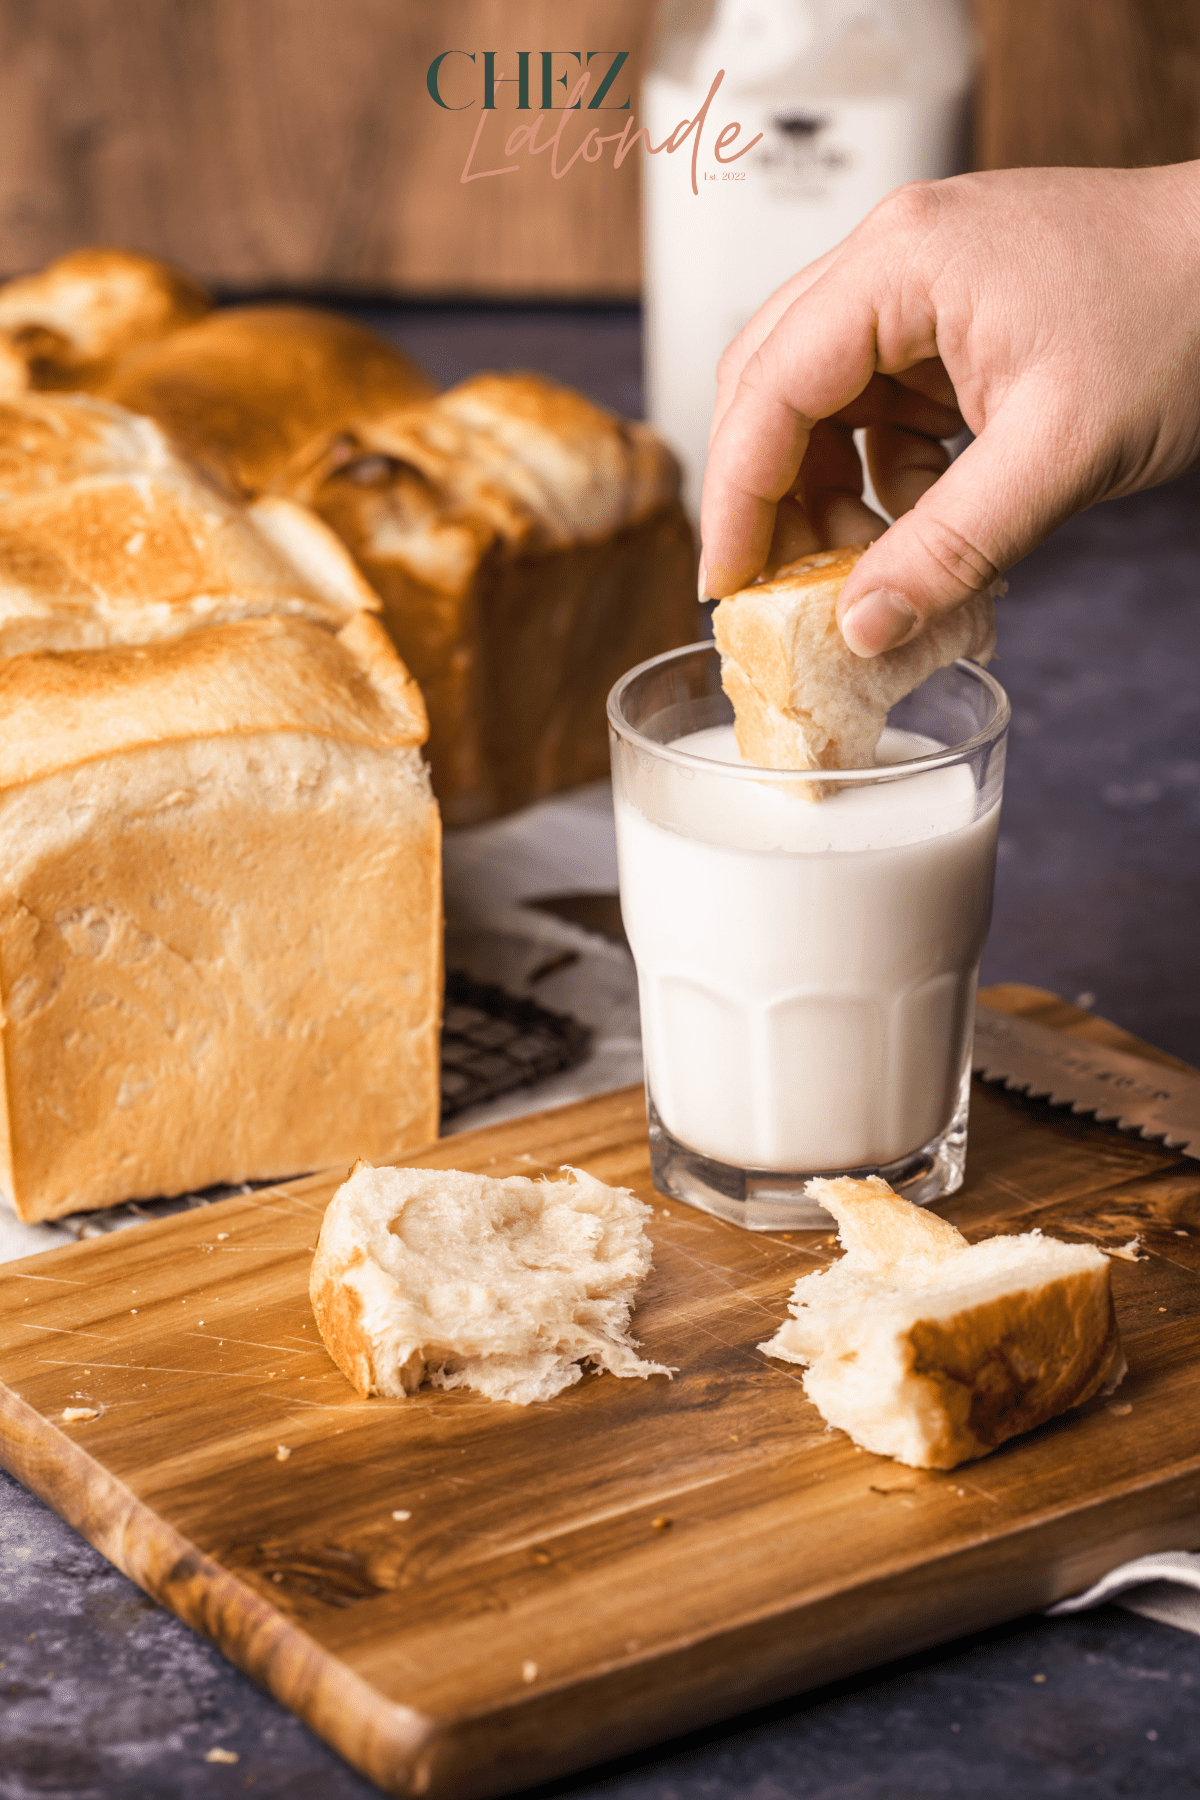
Japanese Milk Bread (AKA Shokupan) is incredibly delicious and versatile. Its fluffy and light texture makes it perfect for sandwiches, toast, and dinner rolls. It’s popular in Japan, Hong Kong, Taiwan, and other Asian countries and is also gaining popularity in the West. This bread involves a unique baking technique called Tangzhong which is a method that adds moisture and softness to the bread, making it incredibly light and fluffy.
Keep reading, and let me show you all of the baking secrets.
Top 5 reasons why you should make Japanese Milk Bread at home
Check them out
- You can customize the flavor and texture to suit your preferences. Add some red bead or taro paste if you want a sweet flavor. But if you want something savory, turn it into some salty garlic dinner roll to pair with your entreé.
- Making Japanese milk bread at home is a great way to build relationships and is a fun activity with family and friends. Moreover, the satisfaction of eating tasty, freshly baked bread you all baked together is priceless!
- It is an economical way to enjoy a sweet treat at home. This bread is incredibly soft, fluffy, and delicious – perfect for any occasion!
- It’s a great way to impress your friends and family with your baking skills.
- Making Japanese Milk bread at home is surprisingly easy and requires few ingredients. The best part is that you can control the quality and quantity of ingredients in the bread.
What is Tangzhong?
The key to achieving Japanese milk bread’s perfect texture is incorporating the Tangzhong in the dough. Tangzhong involves creating a roux-like paste by combining flour with milk together. Then, cook the mixture in a pan over medium heat until it thickens up or reaches 150F. This paste binds with the rest of the dough during the kneading process and helps create that pillowy softness that makes this kind of bread unique and delightful. After making the Tangzhong paste, let it cool down to 95F before you combine all the other ingredients in a mixer and knead the dough until smooth and elastic.
What are the benefits of making Japanese milk bread with the Tangzhong method?
Tangzhong is a secret weapon for baking Japanese Milk Bread. You will be surprised by how this simple technique could give the bread an extra soft texture and amazing tenderness to the end product. With Tangzhong, you can have loaves that are always fresh, thanks to their prolonged shelf life.
What is the difference between Tangzhong and Yudane?
Tangzhong (words written in Chinese) and Yudane (words written in Japanese) are the same things to give Japanese Milk bread that tender, moist, and fluffy result. The only difference is in the cooking process.
Let’s take a look at their difference.
- Tangzhong is a mixture of milk and flour cooked on the stove or microwave. You must cook it until it reaches 150 degrees Fahrenheit or has a paste-like consistency. Once it cools down to 85 to 95 degrees Fahrenheit, you can use it right away.
- Yudane is another cooking technique: 1 part of water and 1 part of flour. You pour boiling water and then mix it in with the flour. Once it looks homogeneous enough, you can wrap it in plastic and store it in the fridge for use the following day.
How To Make the Tangzhong Starter – My lazy and easy way
Traditionally people cook their Tangzhong over the stove. However, I found that making it in the microwave is faster and easier. Also, it is easier to control the temperature too.
First step:
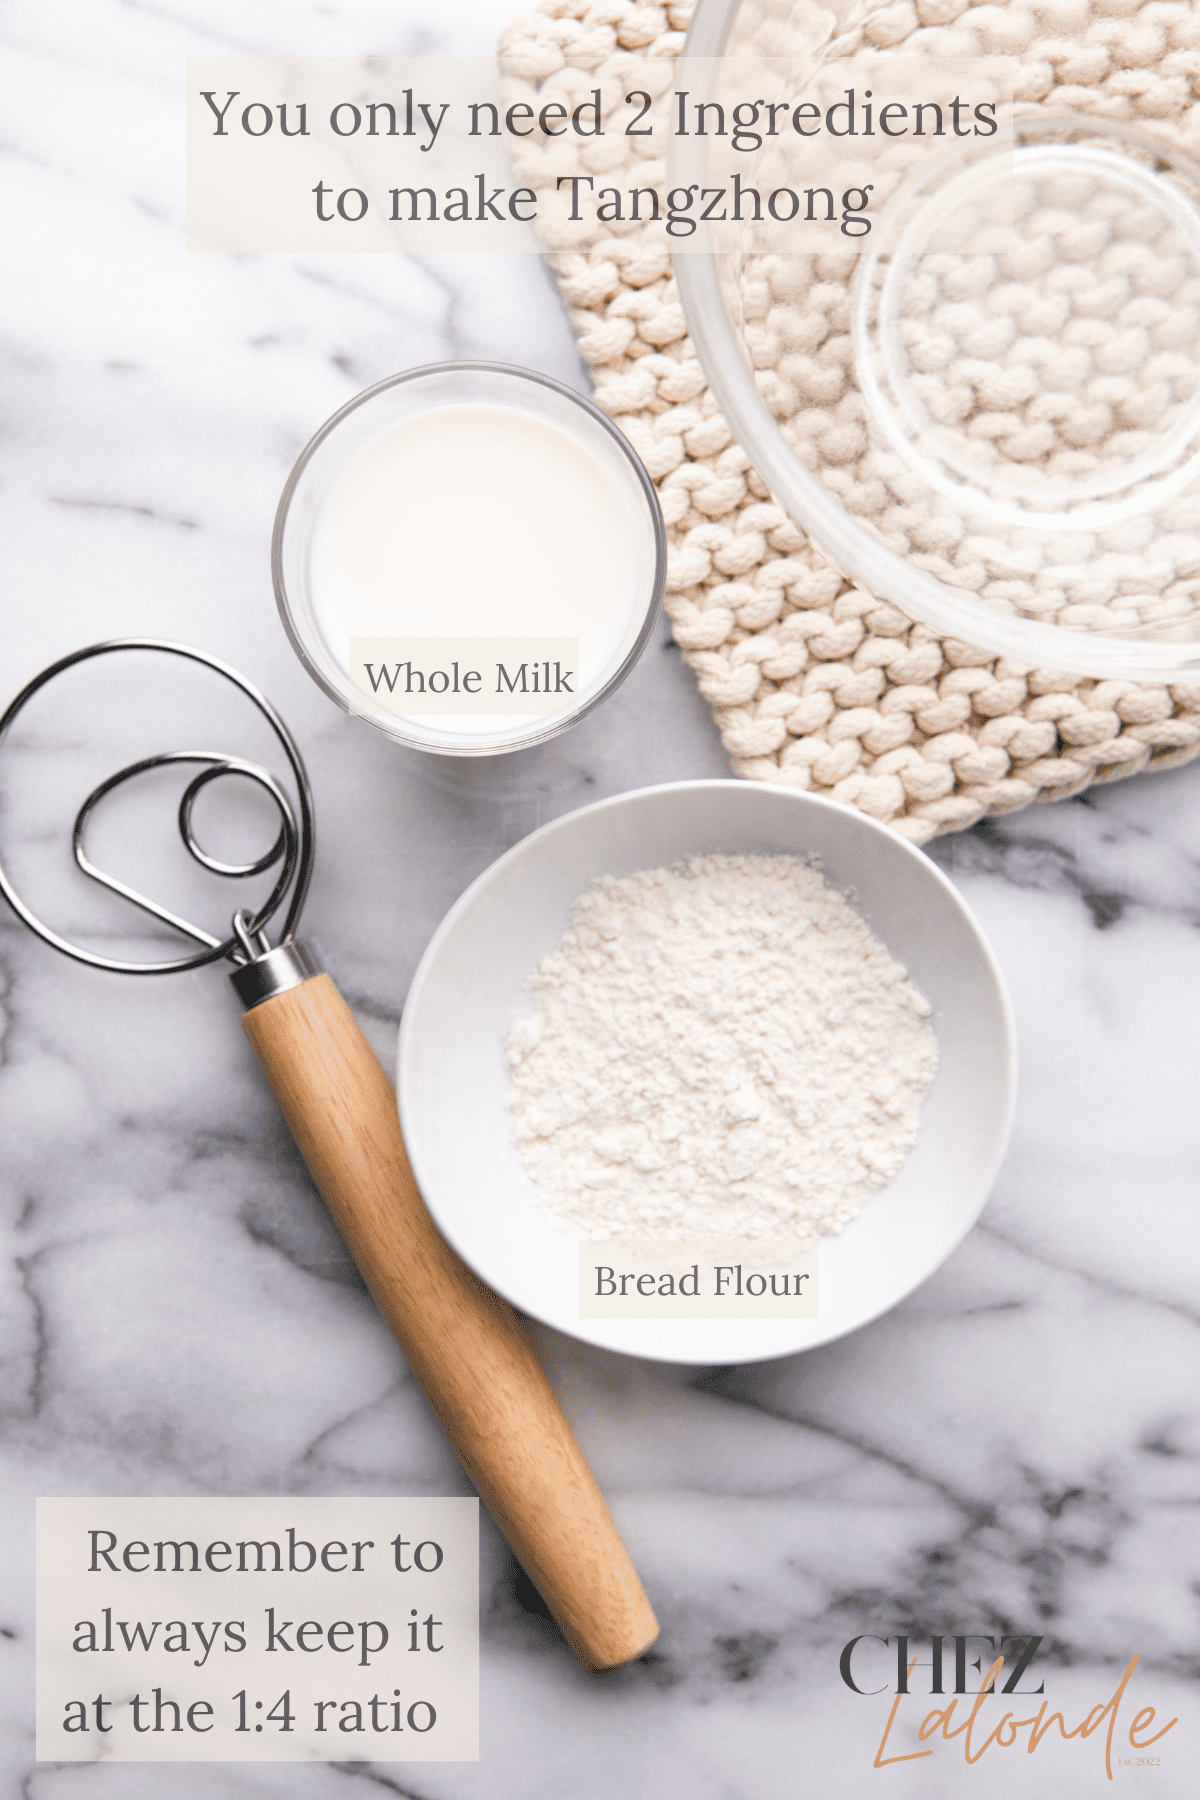
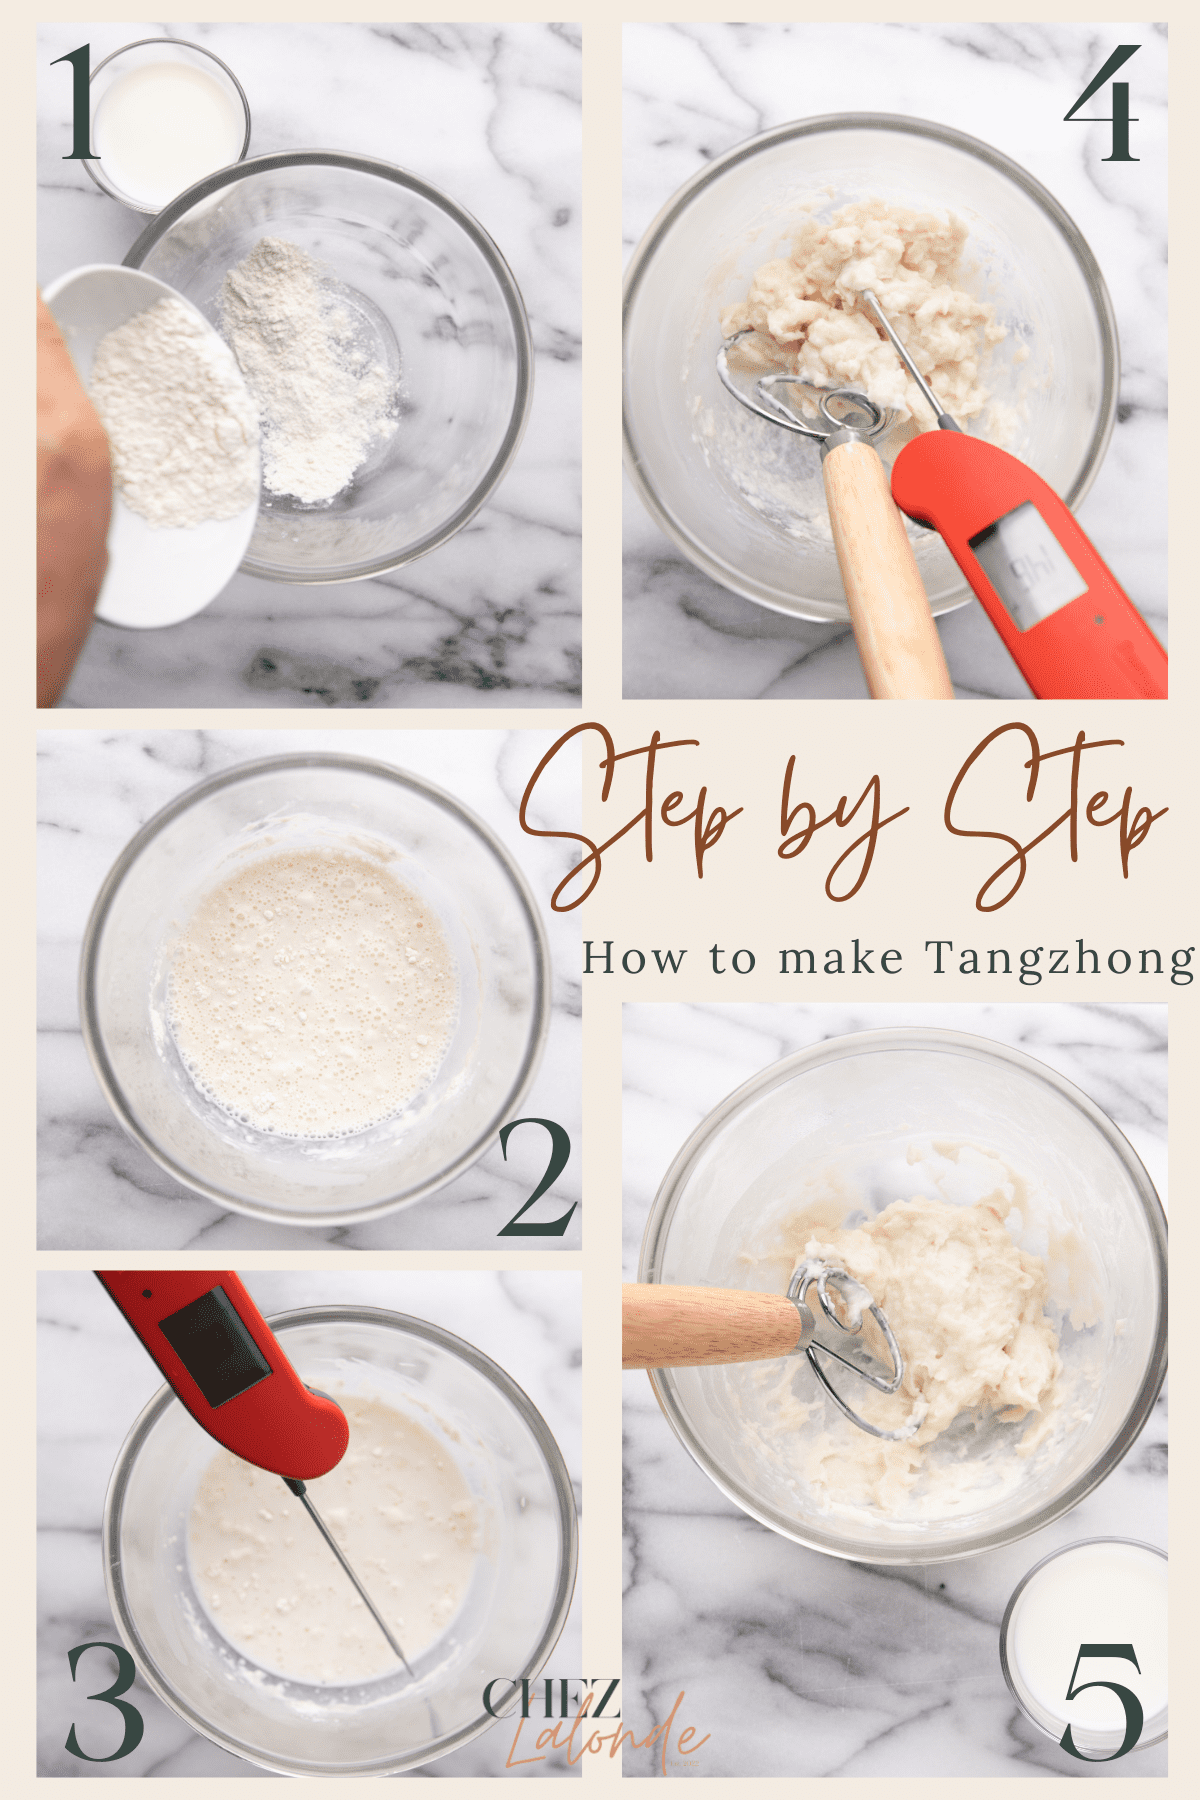
Use a microwave-safe bowl, and add 30g of bread flour and 120g of whole milk. Use a spatula to mix these two ingredients together. Mix well. (Pictures# 1 to 2)
Second Step:
Put the Tangzhong mixture in the microwave and heat it for 20 seconds. Take it out and stir it. Repeat this process precisely three times. The internal temperature of the Tangzhong should reach 150F or 65C on the 3rd time. The consistency will be sticky, like thick glue paste. (Pictures# 3 to 4)
Third step:
Ensure your Tangzhong is cooled to 85F to 95F before adding it to the other ingredients. If it’s too hot, it will kill the yeast, and your bread won’t turn out right. (Picture# 5)
What are some key ingredients for making Japanese Milk Bread?
Recreating Japanese milk bread at home requires just a few simple steps and ingredients. Here are the ingredients that you would need:
Types of baking tools that you’ll need to make this recipe:
How to bake Japanese Milk Bread with Tangzhong?
Step 1 – Making Tangzhong
Take out a microwave-safe bowl, add 120g of whole milk and 30g of bread flour, use a spatula, and mix your ingredients together. Make sure no lumps. (Pictures# 1 to 2)
Step 2 – Cook your Tangzhong
Put your flour and milk mixture in the microwave and microwave it for 20 seconds; take it out and stir your mixture to ensure they don’t dry up. Repeat this process a total of 3 times or until the internal temperature of the mixture reach 150F. Set aside (Pictures# 3 to 5)
Step 3 – Cool down the Tangzhong mixture.
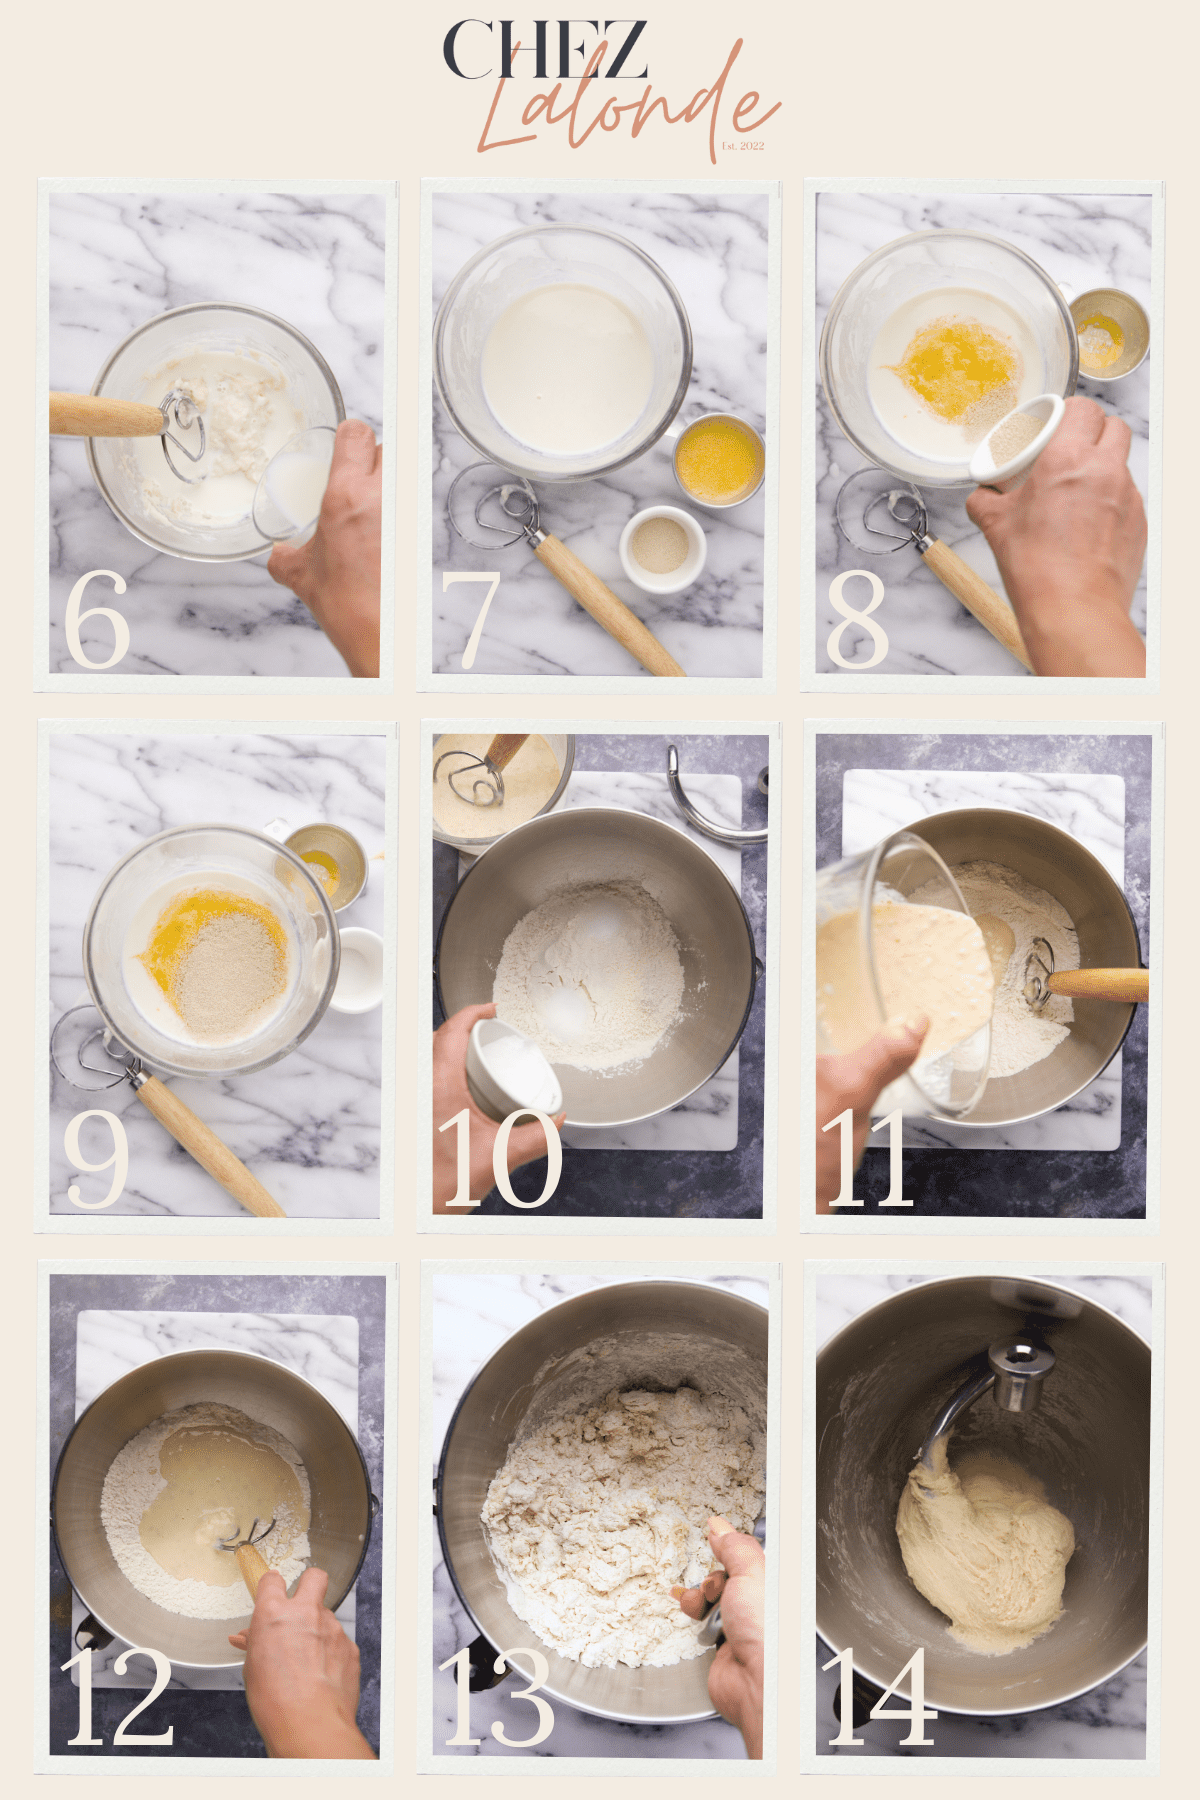
Slowly add half of the cold milk into the cooked Tangzhong mixture, and mix it with helping the mixture cool down to about 95F. (Picture# 6) Once the Tangzhong reaches Room temperature between 85F to 95F, add one egg, the other half of the milk, and a packet of instant yeast. Mixed well. Pour the combined mixture into the stand mixing bowl. (Pictures# 7 to 9)
Step 4 – Make the milk bread
Pour the remaining dry ingredients into a clean stand-mixer bowl, such as bread flour, fine sea salt, and sugar. (Picture# 10) Pour the wet Tangzhong mixture into the dry ingredients and use a Danish dough whisk to combine all the mixture together lightly. (Pictures# 11 to 12) Attach the mixing bowl and the dough hook to the stand mixer, and turn your stand mixer on low speed (speed 4) to mix for 5 minutes. Please make sure all of the ingredients are incorporated together. (Pictures# 13 to 14)
Step 5 – Add in butter and continue to knead and shape the dough
After 5 minutes, increase the speed to level 6 and continue to knead the dough. In the meantime, slowly add your butter to the bowl. One small cube at a time. When you add in the butter, use your finger to gently squish down the butter cubes before you add them to the dough. This way, the butter will be easier to incorporate into the dough. (Pictures# 15 to 16) After you add all the butter cubes, the consistency of the dough will seem very sticky. Don’t worry; let the stand mixer do its magic for another 18 to 20 minutes. The dough should slowly turn into a smooth and elastic consistency. (Like what you see in picture #17)
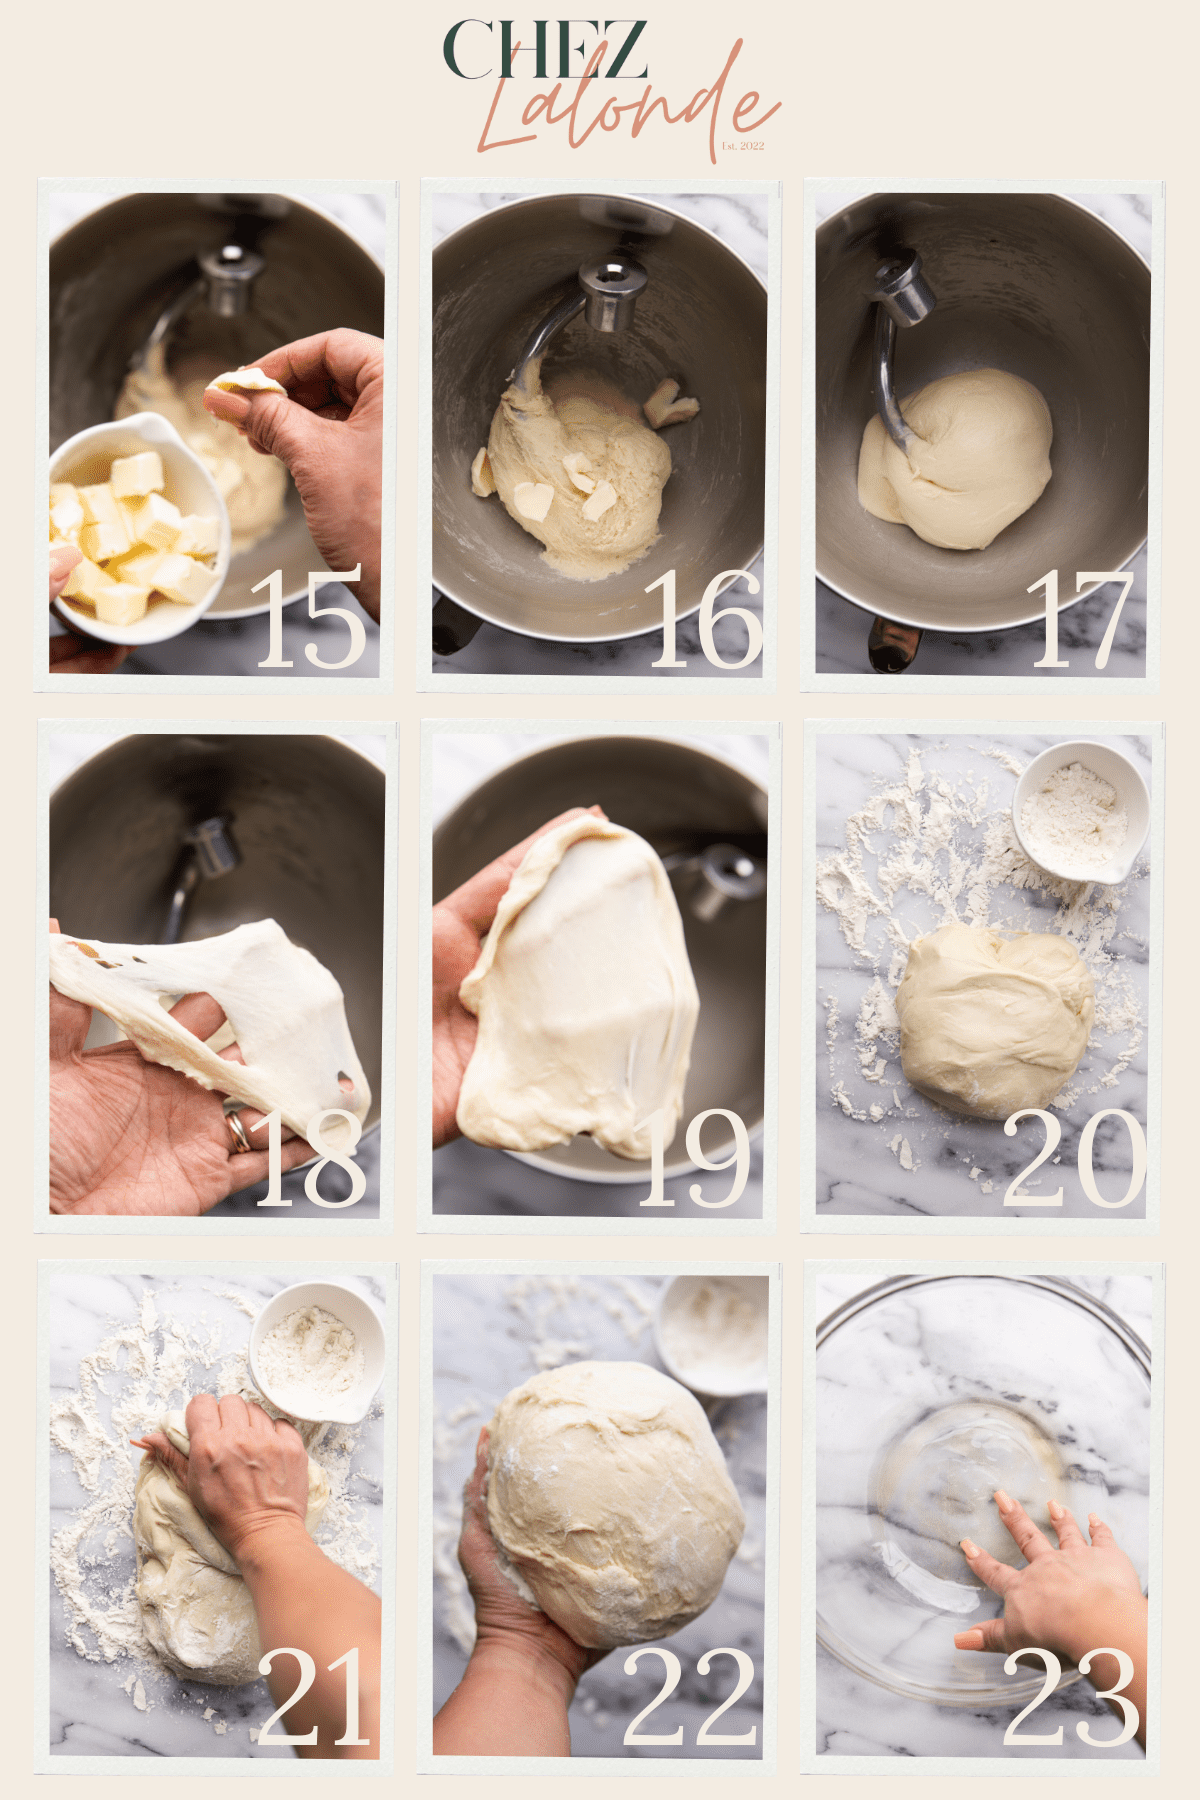
Step 6 – Perform a windowpane test
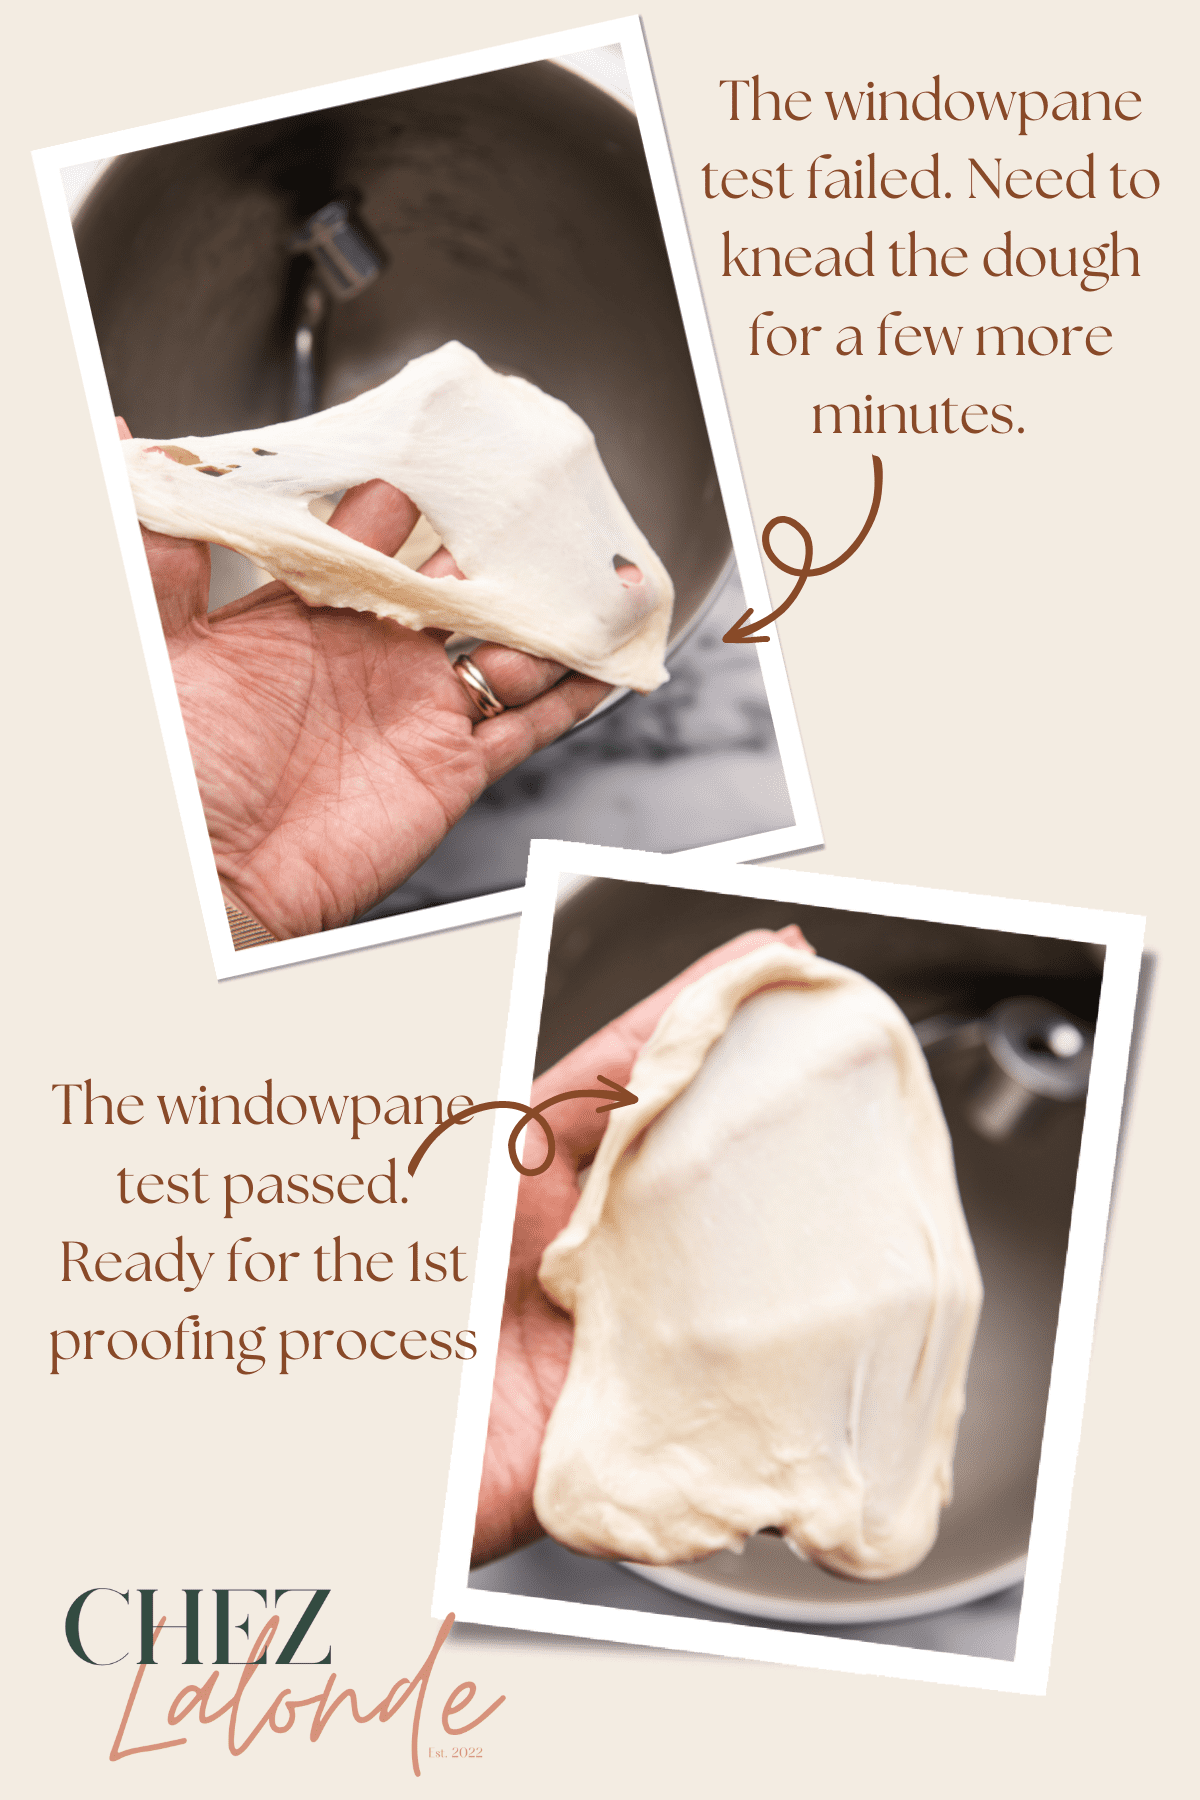
The windowpane test is a way to see if your dough is ready for the first proofing process. To do the test, stretch a small amount of dough from the bowl until it is thin enough to see through. If the dough tears easily, it indicates that gluten development is not ready. (Picture# 18) To improve gluten development, knead the dough in the stand mixer for 2 to 3 more minutes. If the dough stretches without breaking and forms a thin, translucent sheet, this indicates that gluten development is sufficient. (Picture# 19) Remove the dough from the mixing bowl, sprinkle extra bread flour on the kitchen surface, and knead for a few more minutes to form a ball. (Pictures# 20 to 22)
What is a Windowpane test?
The windowpane test is a bread-making technique to test bread dough’s strength and gluten development. To perform the test, pinch off a piece of dough and stretch it between your fingers until it’s thin enough to be translucent. If the dough is strong enough, it should stretch so thin that you can see the light through it, like a windowpane. However, if it breaks, you need to knead the dough for a few more minutes.
Step 7 – First Proof
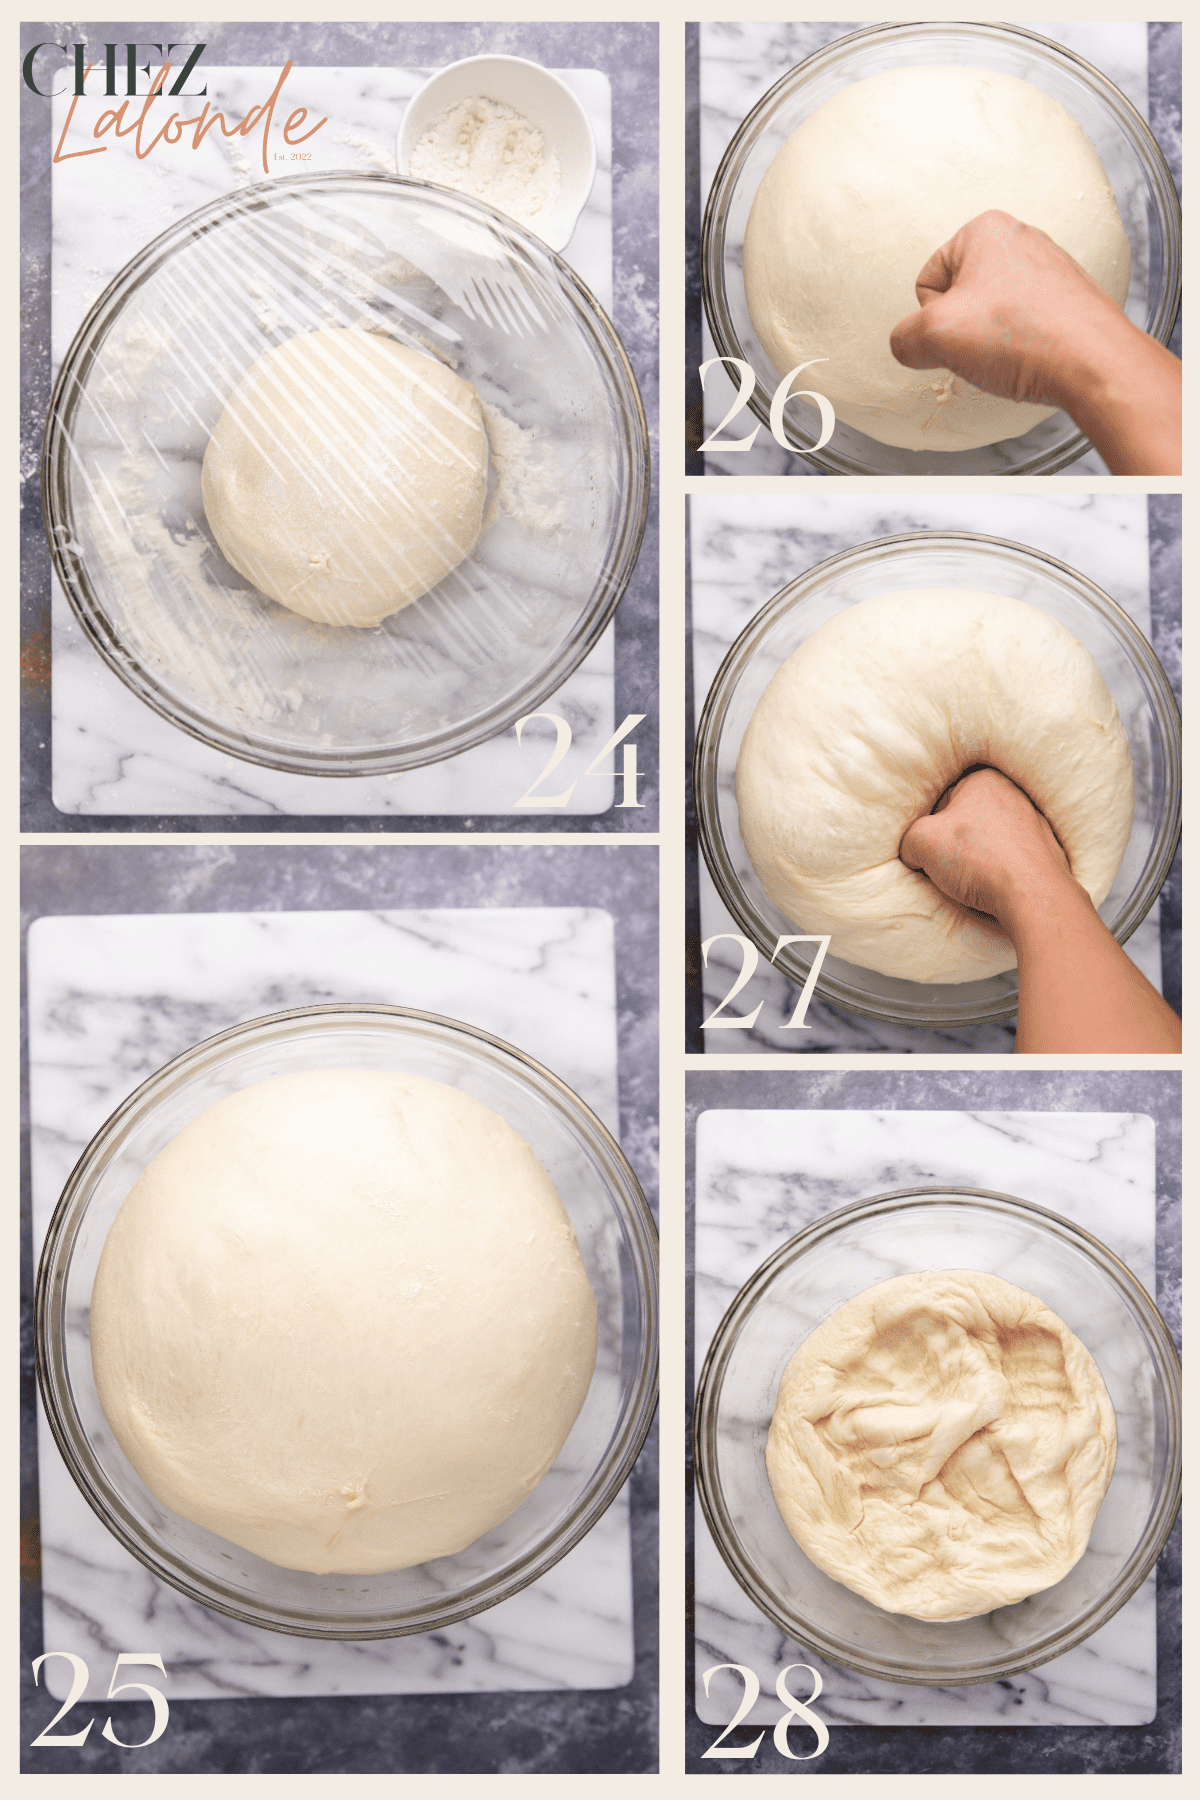
Get another clean bowl, and lightly drizzle a tiny amount of olive oil in the bowl. Use your hand or a brush to evenly spread a thin layer of oil in the bowl to ensure your dough won’t stick, and place your dough inside. (Pictures# 23 to 24) Cover it with either a plastic wrap or a clean kitchen towel and place it in a warm place to proof for about 1 hour or until it is double the size. (Picture# 25)
What exactly is dough proofing?
Proofing is making the bread dough rise before baking. To do this, leave the coved dough in a warm and humid environment so the yeast can activate and expand the dough. Proofing bread dough is important because it makes the bread soft and fluffy and helps develop its flavor.
Step 8 – Second proof
After the first proof is done, the dough has doubled in size. You can lightly dust flour on the dough and punch it to deflate. (Pictures# 26 to 28) Lightly dust your work counter to ensure your dough won’t stick. (Pictures# 29 to 30) Put it on your kitchen scale to get the total weight.(Picture# 31) Then divide it into three equal parts. Roll them into three dough balls. (Pictures# 32 to 33)
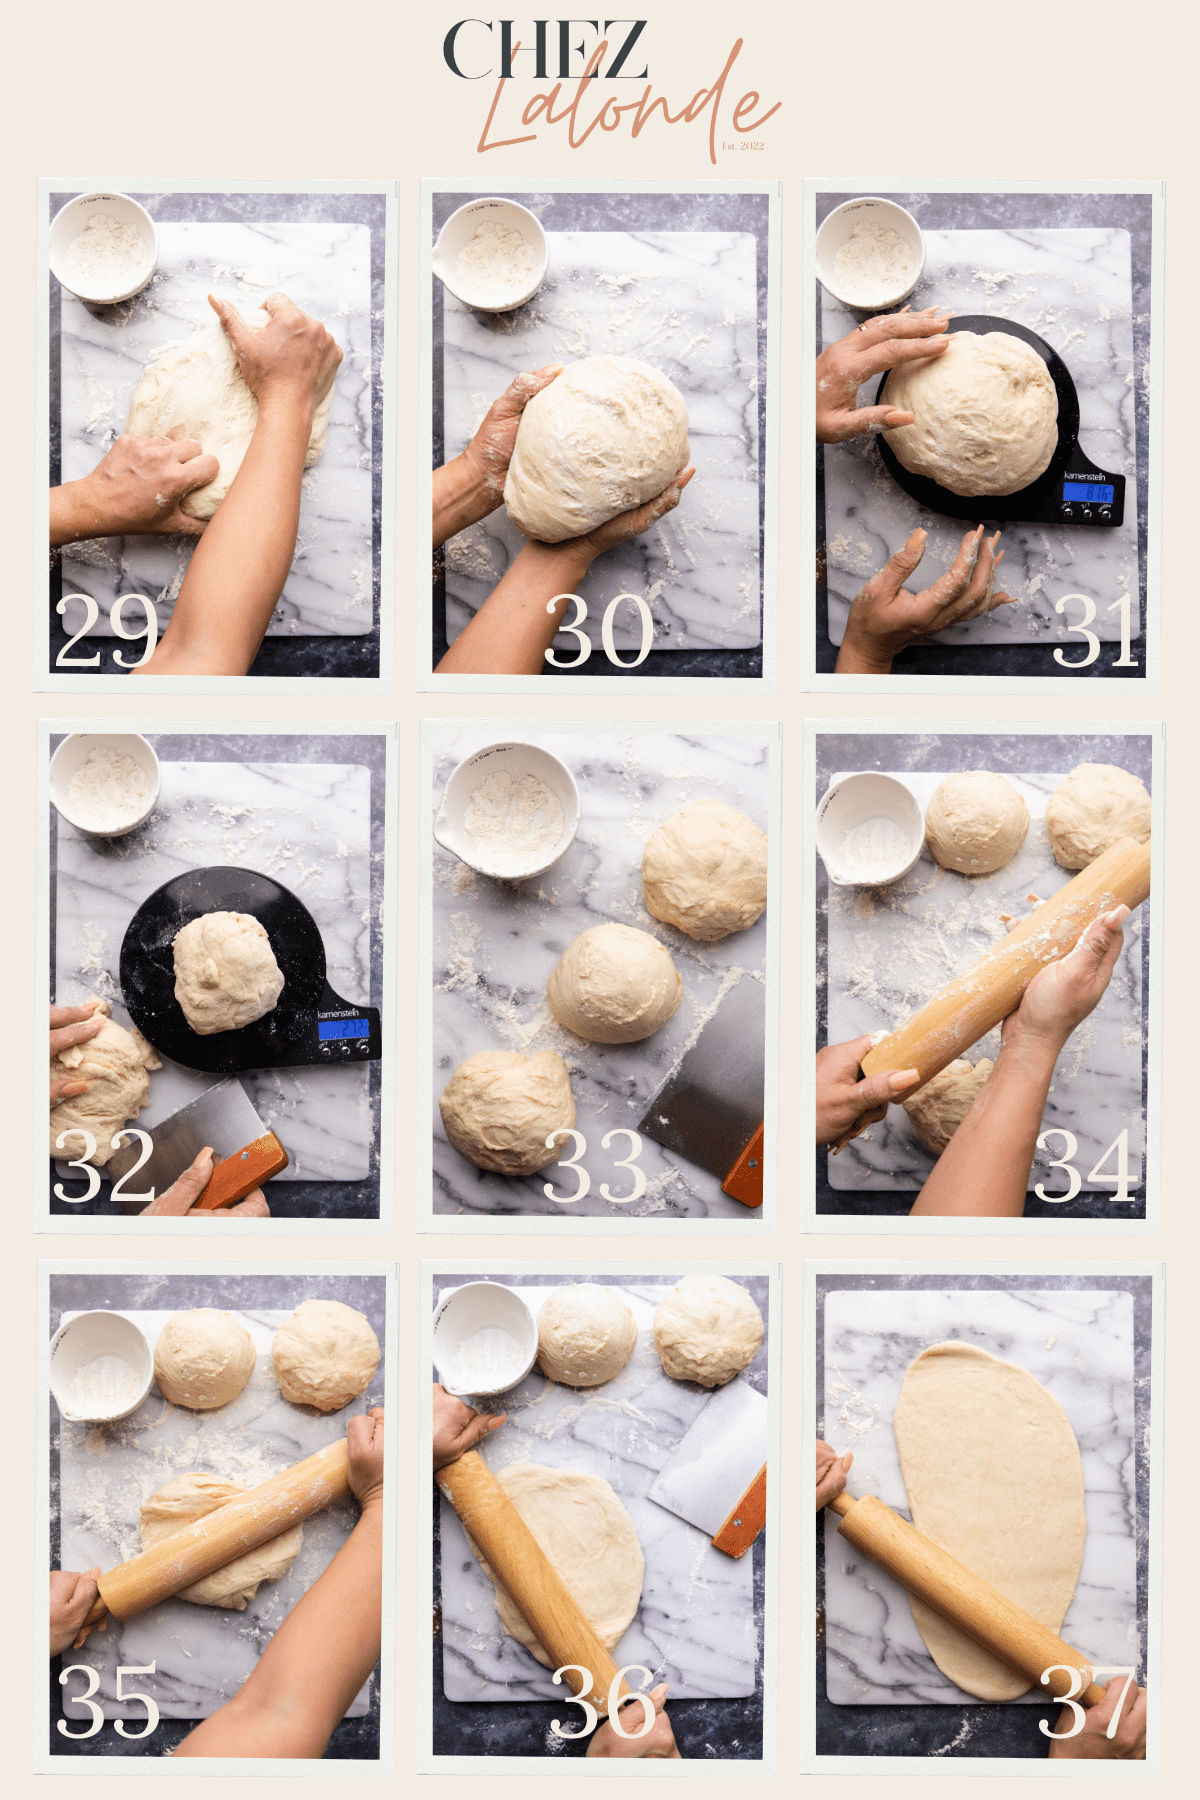
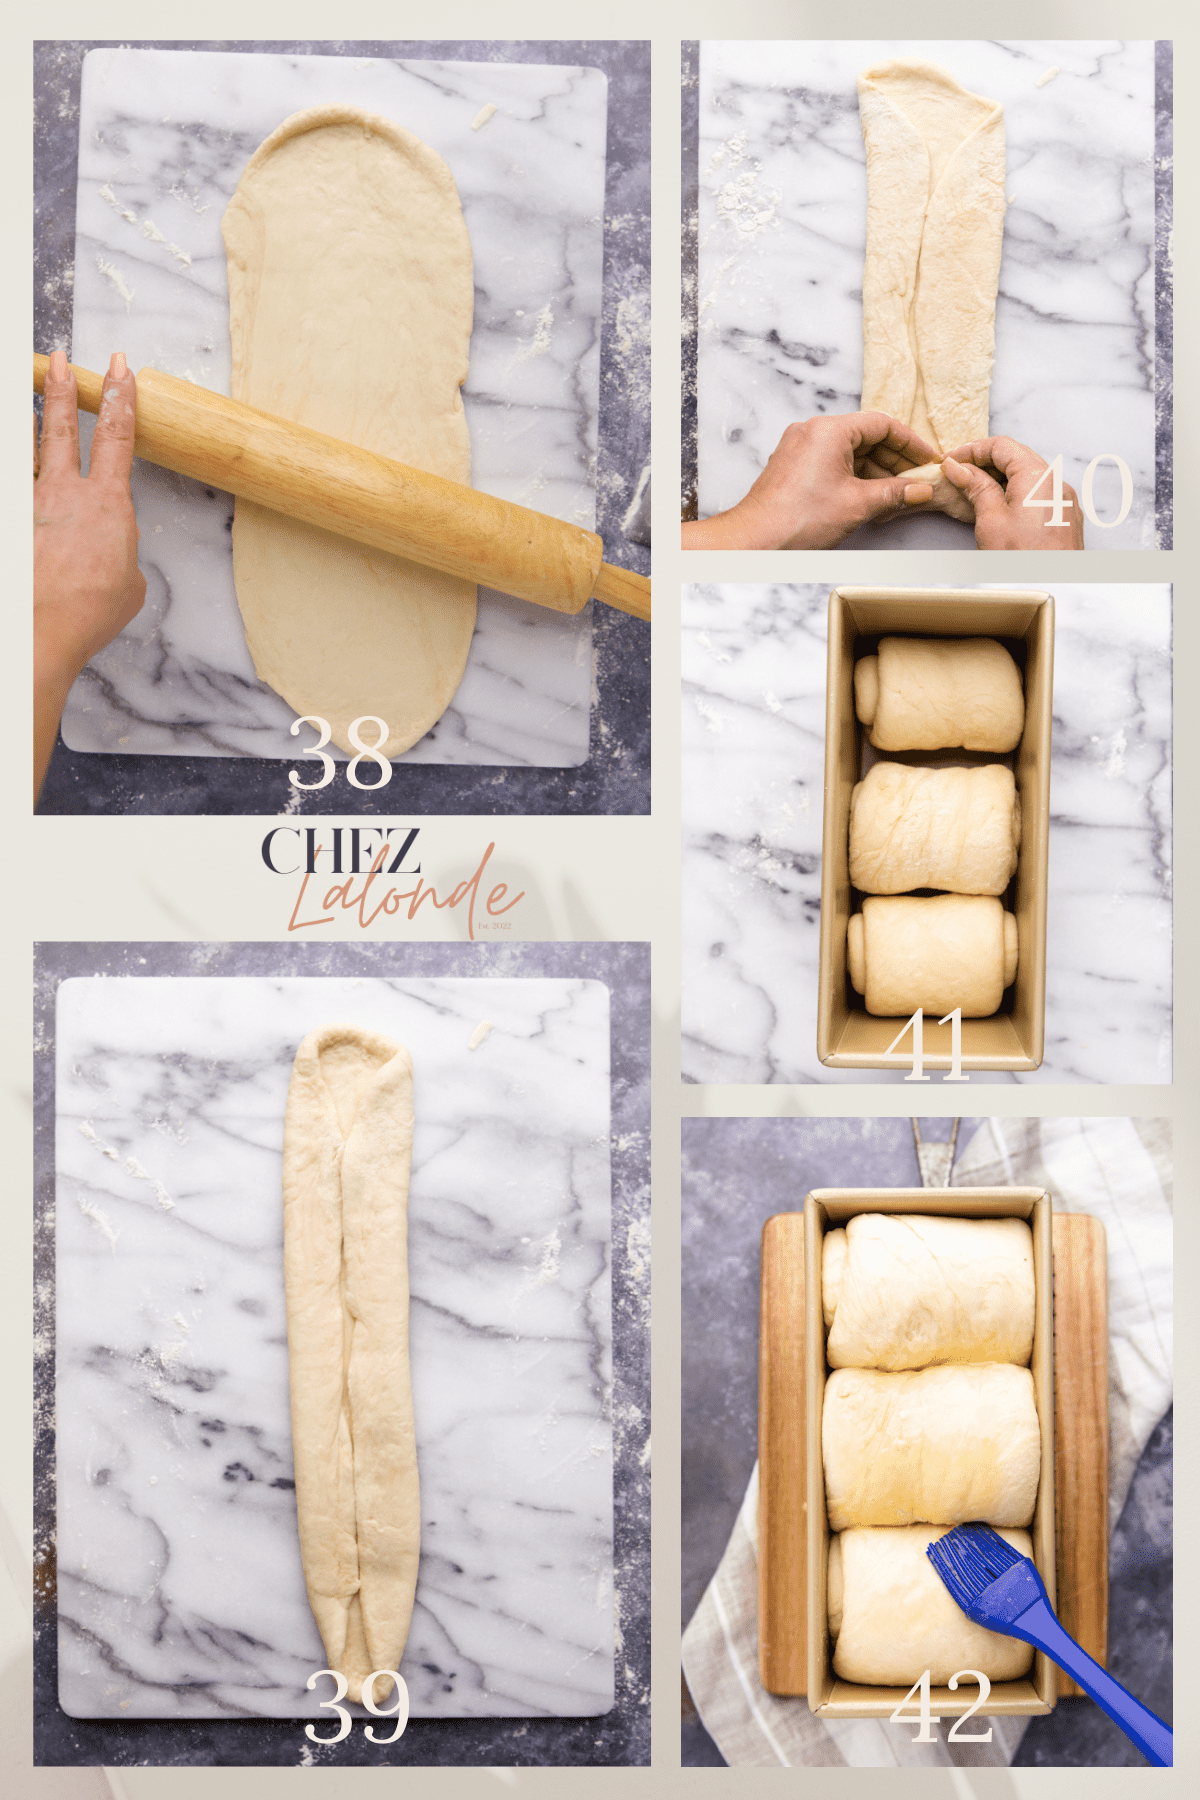
Step 9 – Shape your dough.
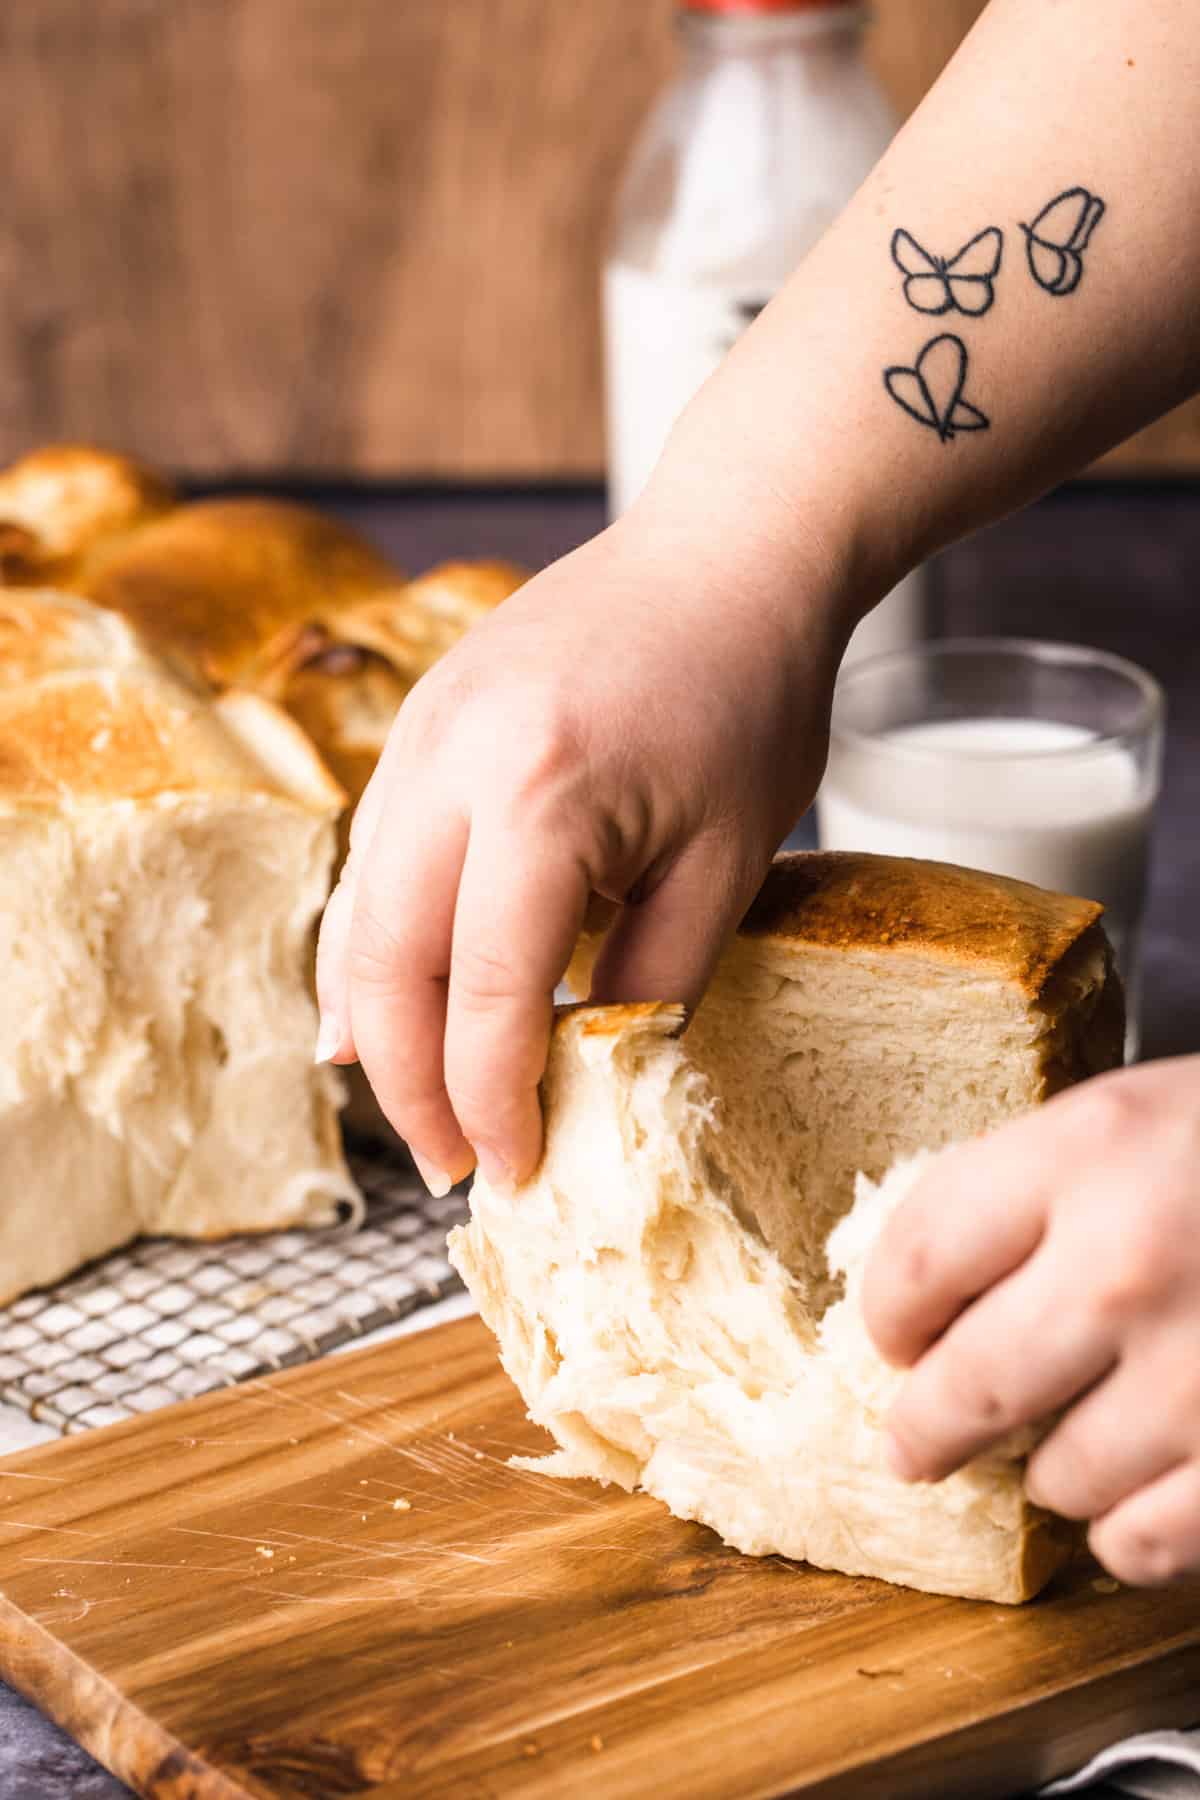
Once equally separated, knead each ball and roll it into a rectangular shape. (Pictures# 34 to 38) Pull and pinch the dough. Fold the long side in and roll up the dough like a pinwheel. (Pictures# 39 to 40) Repeat the same process on the other two dough balls. Place all three shaped doughs into the Pullman bread pan, giving it space to proof. (Picture# 41) Cover the pan with plastic or a clean kitchen towel. Let it proof for the second time for roughly 45 minutes to an hour or until it doubles the size.
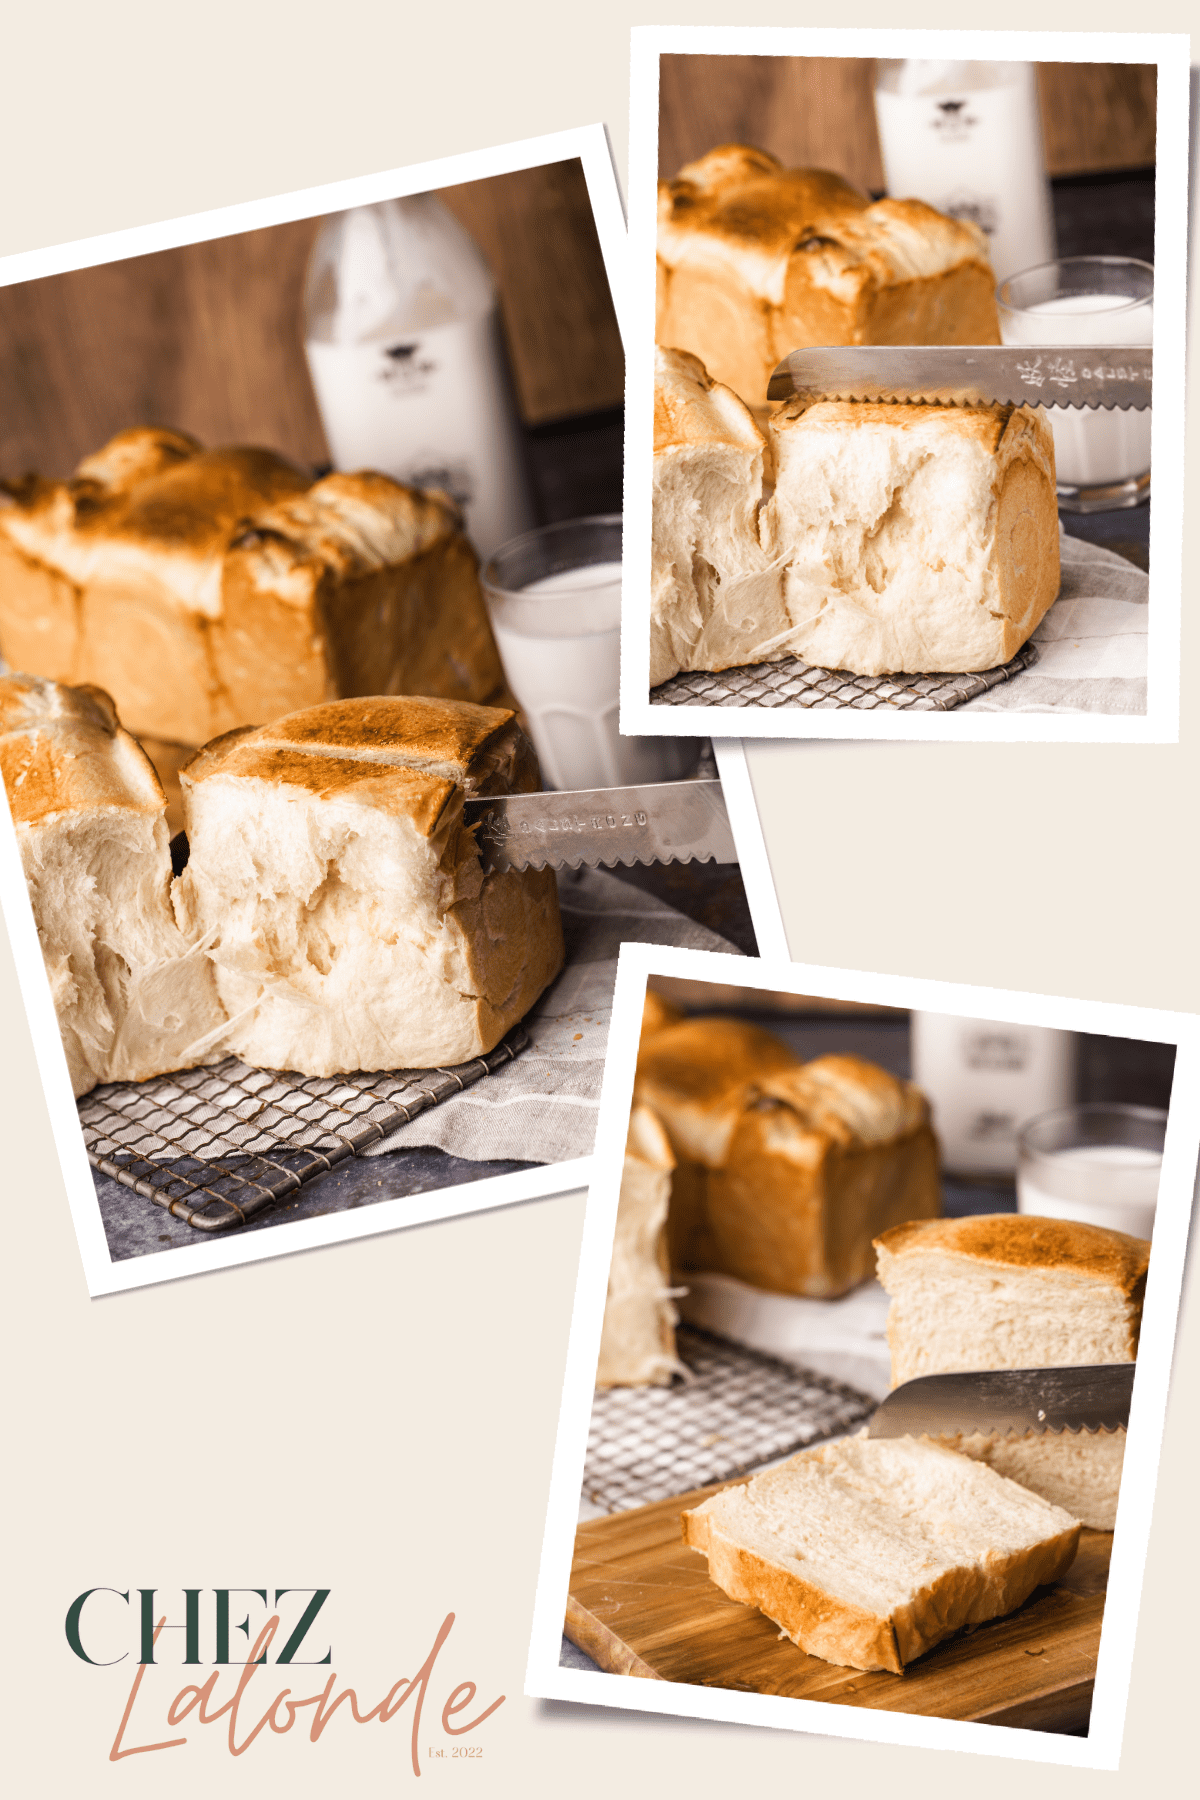
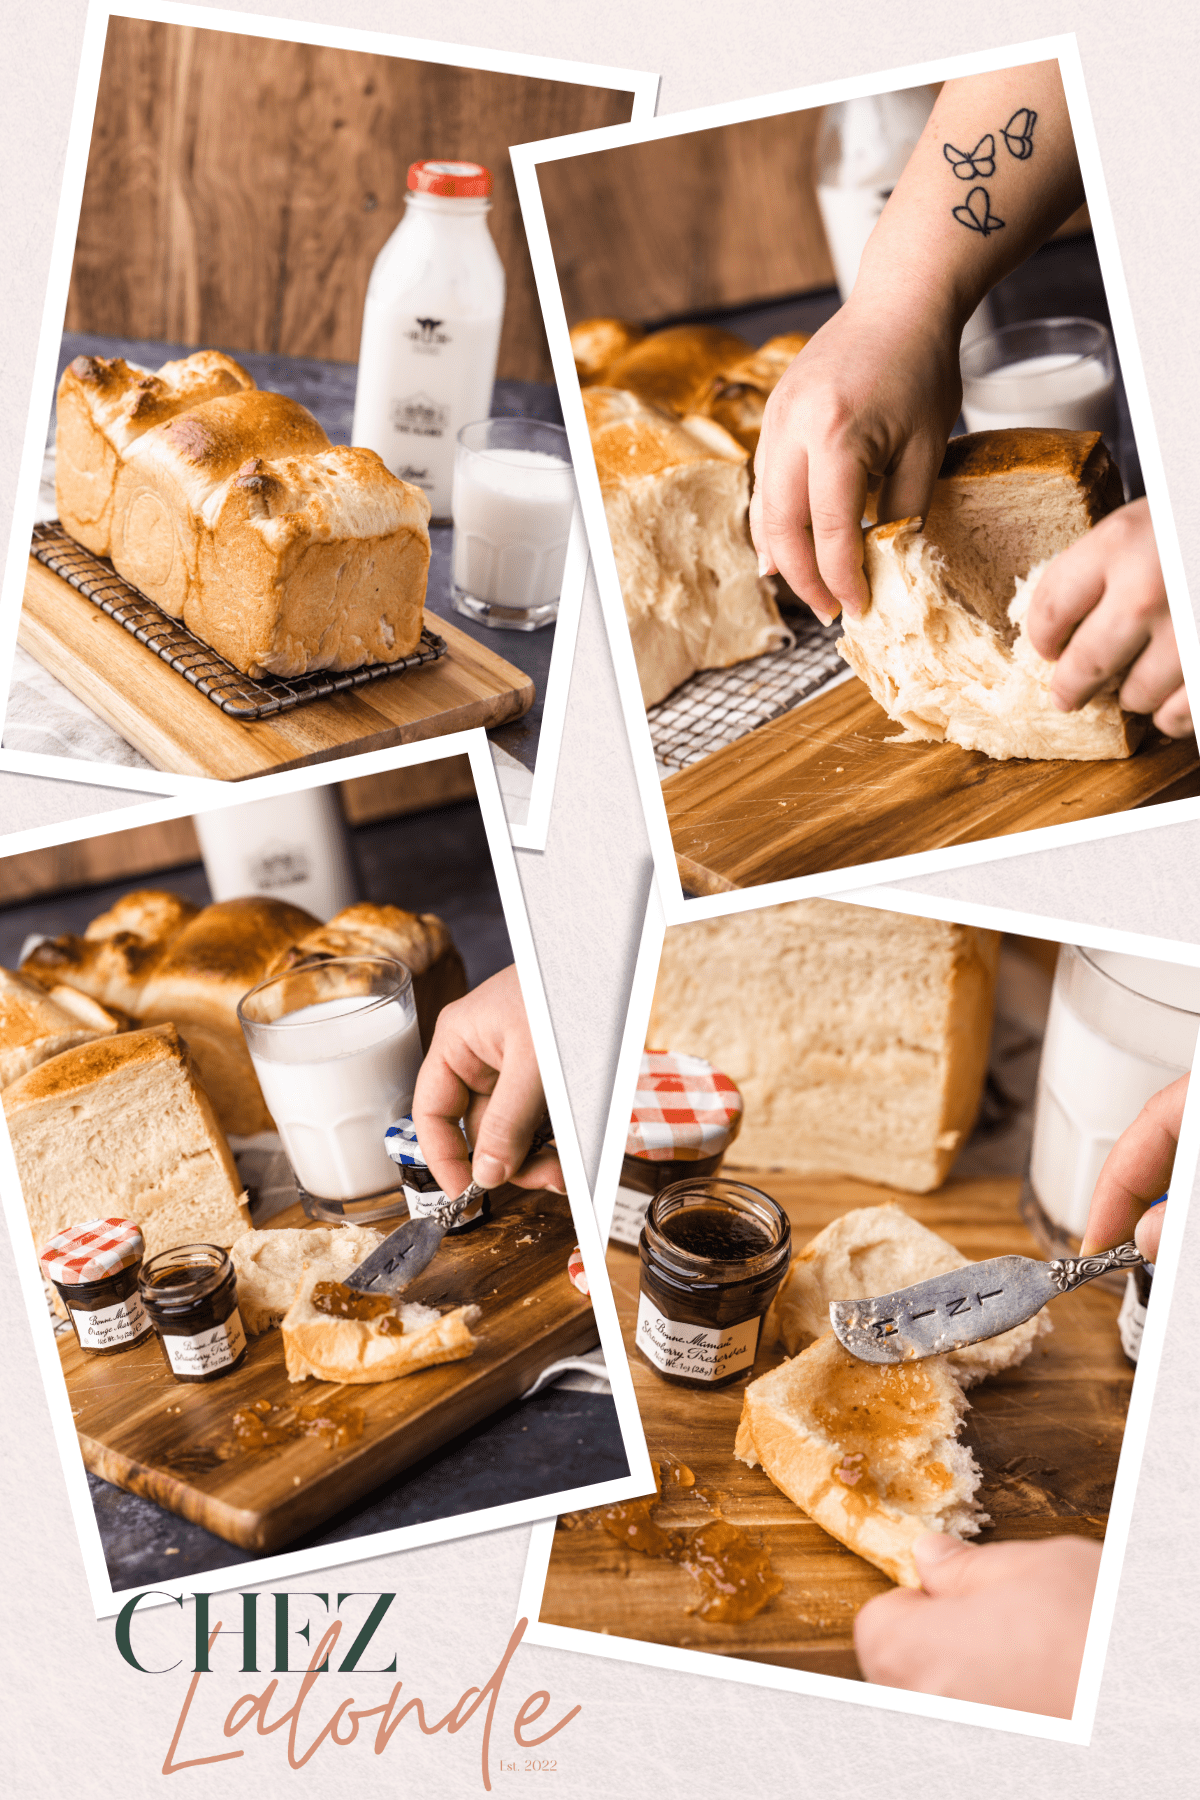
Step 10 – Bake your bread
Preheat your oven to 350F. Once your dough is double the size, whisk one egg and one tablespoon of milk together to make the egg wash. Brush your bread with a thin layer of egg wash, then bake it at 350F for 15 to 18 minutes or until golden. You can insert a kitchen thermometer to test its doneness. The internal temperature should reach 195F. (Picture# 42)
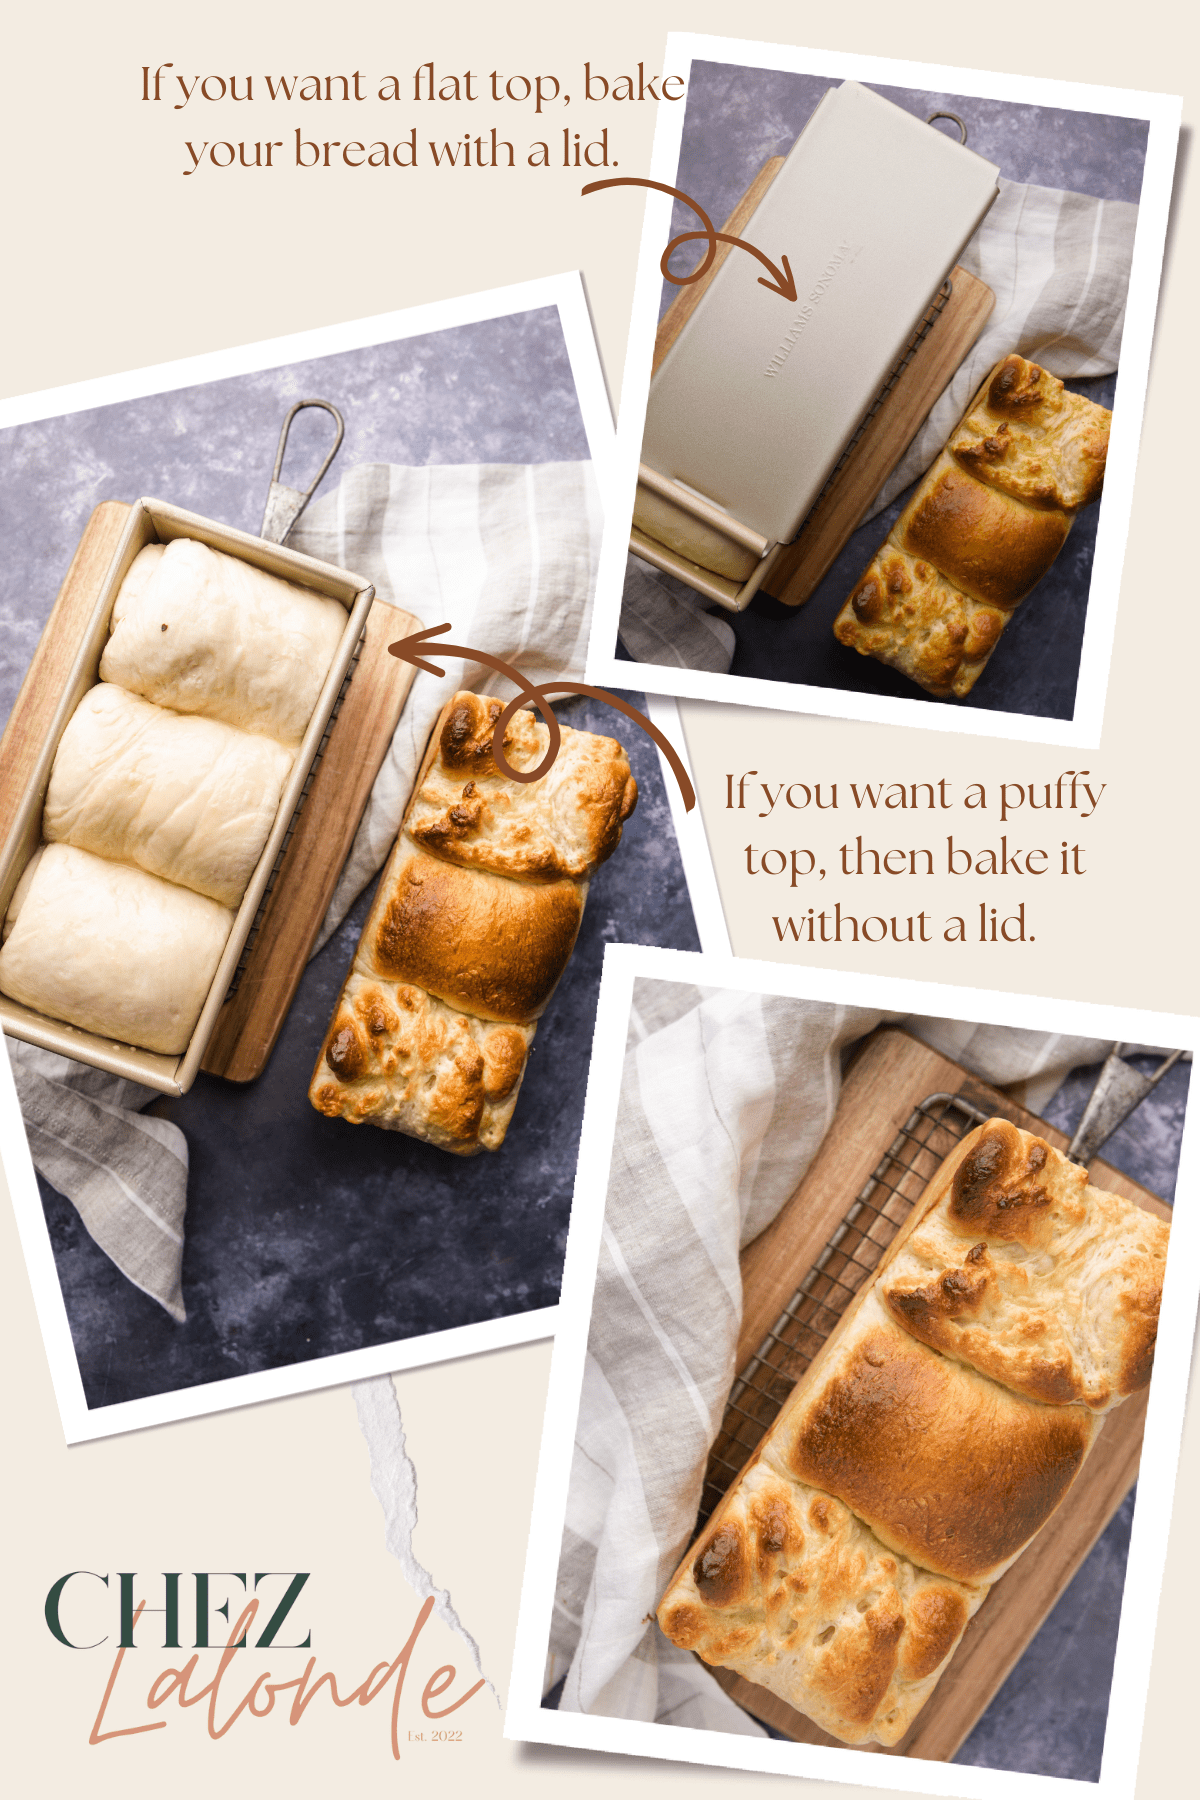
Why the Pullman bread pan comes with a lid? What is that for?
The Pullman bread pan comes with a lid for two main reasons.
Firstly, creating a sealed environment helps keep the bread moist and fresh for extended periods.
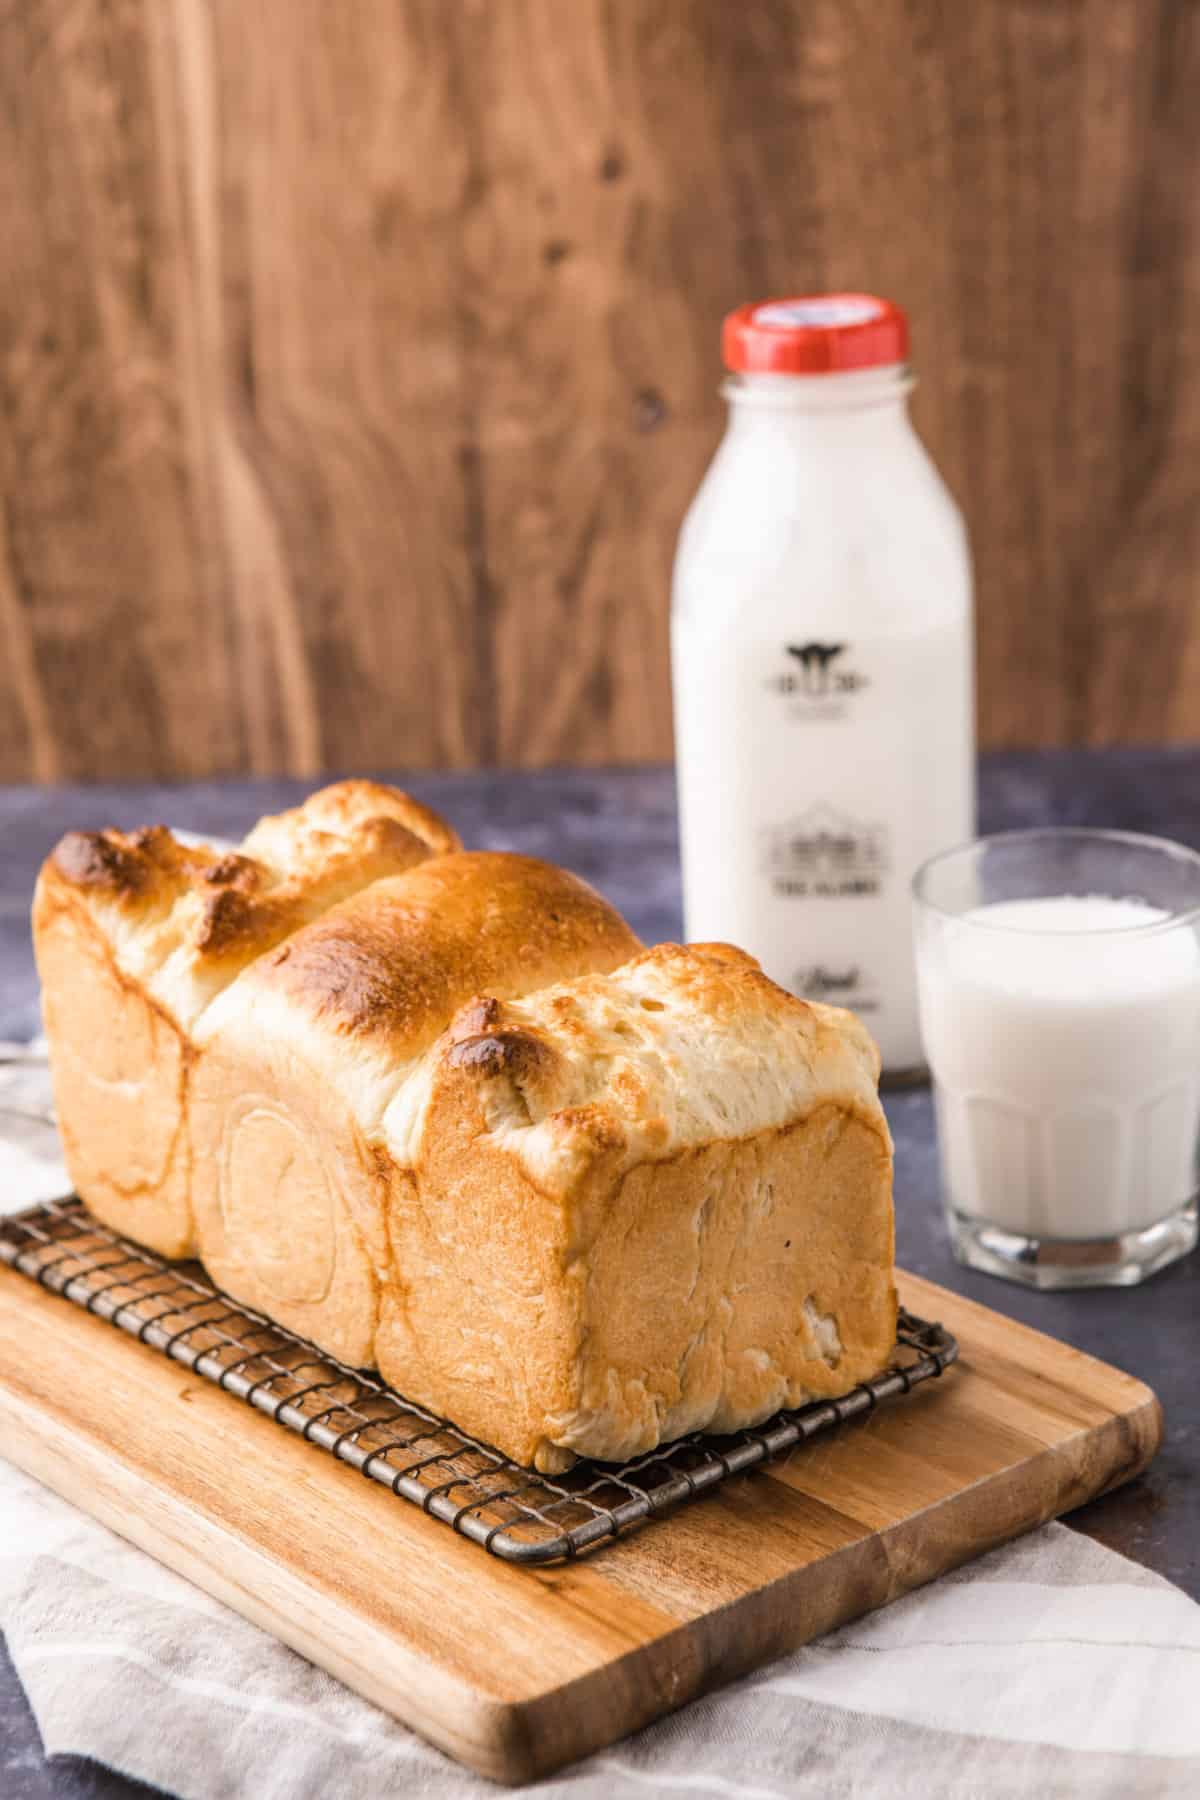
Secondly, its uniform height helps the bread rise evenly and keeps the shaped loaf. With the lid on, your bread will form that perfect Shokupan shape. Or, if you choose to leave off the lid, you can make some cute puffed-up shape bread. The bread will taste amazing either way.
Tips for perfecting your baking technique:
A few things to remember when making Japanese milk bread to ensure it turns out perfectly every time.
Different variations of Japanese milk bread
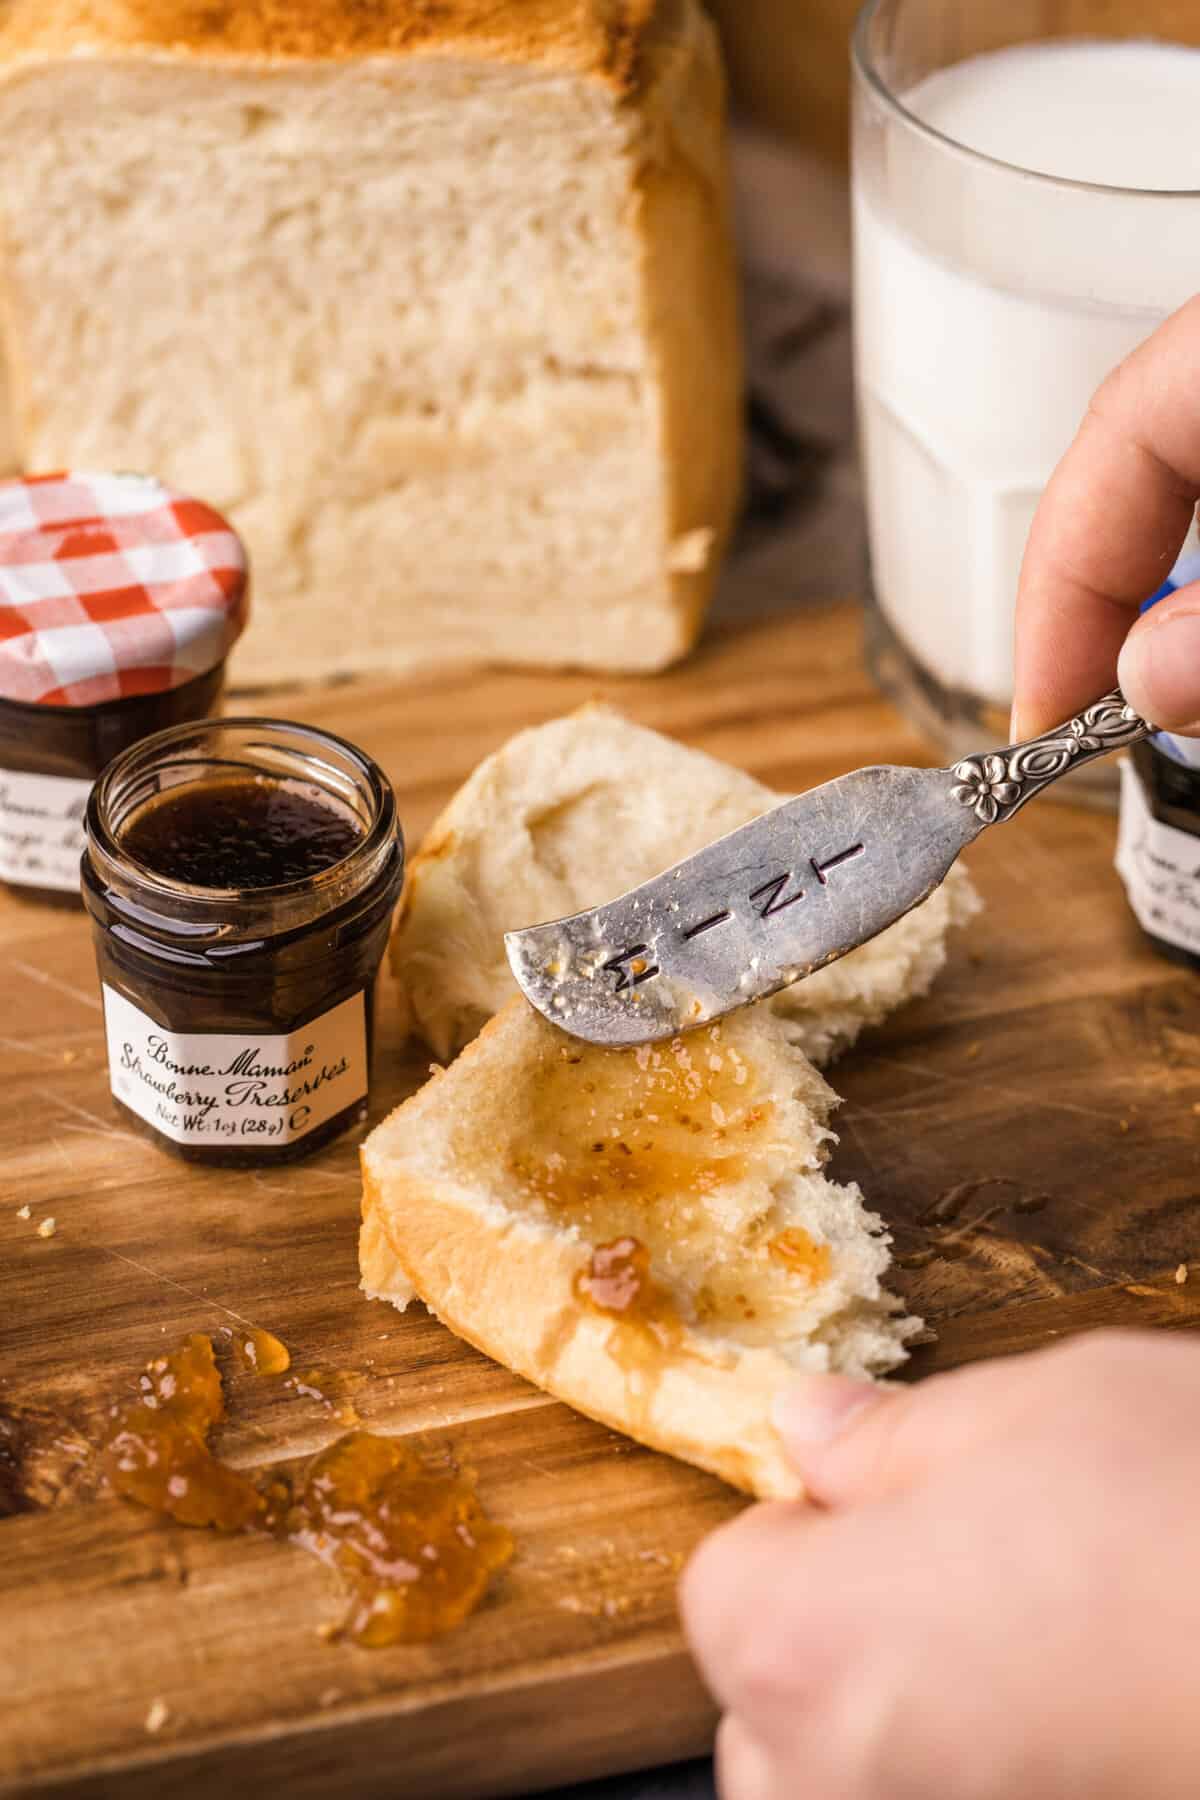
You can enjoy Japanese milk bread in many different ways. One of the popular variations is chocolate milk bread. You can add some chocolate chips to the dough before baking. Another variation is matcha milk bread, which uses matcha powder instead of cocoa powder for a distinctly green flavor. There are endless possibilities for variations of this delicious bread, so feel free to experiment until you find your perfect recipe!
How to store your bread?
- One of the best ways to keep your loaf of Japanese milk bread fresh is by storing it in an airtight container. The container will help trap any moisture from evaporating and keep the bread fresher for longer.
- You must ensure your baked milk bread is completely cool before storing it. Allowing the Japanese Milk Bread to cool completely will reduce the steam from trapping inside the container. The condensation will ruin the surface and texture of the bread. Any extra moisture can make your bread get soggy or even moldy quickly.
- Another method is to freeze the Japanese Milk Bread once it has cooled down after baking. You can store it for several weeks without sacrificing its taste or texture.
FAQs About Japanese Milk Bread
Whether you’re looking to impress someone special or want to try something new in the kitchen, learning how to make Japanese milk bread will surely be satisfying! So why not take a chance next time you feel creative in the kitchen? There’s no better way than trying out some delicious homemade Japanese milk bread!
I will love to see your creation if you try this recipe. Feel free to tag me on Instagram @chezlalonde and #Cookingwithlalonde. I can’t wait to hear about your experience! Enjoy!
Print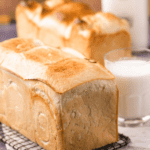
How To Make Japanese Milk Bread using the Tangzhong Method
- Total Time: 4 hours 20 minutes
- Yield: 1 loaf
Description
Learn how to make fluffy and delicious Japanese Milk Bread using the Tangzhong method! This easy-to-follow recipe provides step-by-step instructions and helpful tips to ensure your bread turns out perfectly every time. Japanese Milk Bread, also known as Shokupan, is a white bread made with a high proportion of milk, giving it a soft and fluffy texture. It is usually served as a breakfast or snack item and is often used in making sandwiches and toast. It has a mild, sweet flavor and is popular in many Asian bakeries. With just a few simple ingredients, you can make this delicious bread in the comfort of your own home. Try it today and enjoy the unique texture and flavor of Japanese Milk Bread!
Ingredients
Tangzhong ingredients
30g of Bread flour
120g of Whole milk
Milk Bread Ingredients
120g of Whole milk
350g of Bread flour
14g of Milk Powder
8g of Instant yeast
56g of Egg
30g of granulated sugar
56g of softened unsalted butter
6g of fine sea salt
Egg wash ingredients
1 Large Egg
1 tablespoon of whole milk
Instructions
Take out a microwave-safe bowl, add 120g of whole milk and 30g of bread flour, use a spatula, and mix your ingredients together. Make sure no lumps.
Put your flour and milk mixture in the microwave and microwave it for 20 seconds; take it out and stir your mixture to ensure they don’t dry up. Repeat this process a total of 3 times or until the internal temperature of the mixture reach 150F. Set aside
Slowly add half of the cold milk into the cooked Tangzhong mixture, and mix it with helping the mixture cool down to about 95F. Once the Tangzhong reaches Room temperature between 85F to 95F, add one egg, the other half of the milk, and a packet of instant yeast. Mixed well. Pour the combined mixture into the stand mixing bowl.
Pour the remaining dry ingredients into a clean stand-mixer bowl, such as bread flour, fine sea salt, and sugar. Pour the wet Tangzhong mixture into the dry ingredients and use a Danish dough whisk to combine all the mixture together lightly. Attach the mixing bowl and the dough hook to the stand mixer, and turn your stand mixer on low speed (speed 4) to mix for 5 minutes. Please make sure all of the ingredients are incorporated together.
After 5 minutes, increase the speed to level 6 and continue to knead the dough. In the meantime, slowly add your butter to the bowl. One small cube at a time. When you add in the butter, use your finger to gently squish down the butter cubes before you add them to the dough. This way, the butter will be easier to incorporate into the dough. After you add all the butter cubes, the consistency of the dough will seem very sticky. Don’t worry; let the stand mixer do its magic for another 18 to 20 minutes. The dough should slowly turn into a smooth and elastic consistency.
The windowpane test is a way to see if your dough is ready for the first proofing process. To do the test, stretch a small amount of dough from the bowl until it is thin enough to see through. If the dough tears easily, it indicates that gluten development is not ready. To improve gluten development, knead the dough in the stand mixer for 2 to 3 more minutes. If the dough stretches without breaking and forms a thin, translucent sheet, this indicates that gluten development is sufficient. Remove the dough from the mixing bowl, sprinkle extra bread flour on the kitchen surface, and knead for a few more minutes to form a ball.
Get another clean bowl, and lightly drizzle a tiny amount of olive oil in the bowl. Use your hand or a brush to evenly spread a thin layer of oil in the bowl to ensure your dough won’t stick, and place your dough inside. Cover it with either a plastic wrap or a clean kitchen towel and place it in a warm place to proof for about 1 hour or until it is double the size.
After the first proof is done, the dough has doubled in size. You can lightly dust flour on the dough and punch it to deflate. Lightly dust your work counter to ensure your dough won’t stick. Put it on your kitchen scale to get the total weight. Then divide it into three equal parts. Roll them into three dough balls.
Once equally separated, knead each ball and roll it into a rectangular shape. Pull and pinch the dough. Fold the long side in and roll up the dough like a pinwheel. Repeat the same process on the other two dough balls. Place all three shaped doughs into the Pullman bread pan, giving it space to proof. Cover the pan with plastic or a clean kitchen towel. Let it proof for the second time for roughly 45 minutes to an hour or until it doubles the size.
Preheat your oven to 350F. Once your dough is double the size, whisk one egg and one tablespoon of milk together to make the egg wash. Brush your bread with a thin layer of egg wash, then bake it at 350F for 15 to 18 minutes or until golden. You can insert a kitchen thermometer to test its doneness. The internal temperature should reach 195F.
Notes
- It’s essential to make sure your instant yeast is fresh. Fresh yeast will help the dough to rise correctly. Not only do you always need to check the expiration date. But an opened jar of yeast will only last for 4 to 6 months after it is opened. Ensure you keep the jar of yeast in the fridge once it is opened.
- Get yourself a kitchen thermometer for baking. It can help you monitor your food’s doneness and ensure it is cooked to the proper temperature for the best result.
- Be patient, and make sure the dough is kneaded for at least 18 to 20 minutes to develop the gluten properly.
- Make sure to let the dough rise in a warm place; if it’s too cold, the bread will take longer to rise and may not reach its full potential.
- Prep Time: 4 hours
- Cook Time: 20 minutes
- Category: Dessert
- Method: Baked
- Cuisine: Japanese